Vintage Mustang Forums banner

Newb, 66 Coupe with Boosted Inline Six

27K views 147 replies 47 participants last post by  66sprint6  
#1 ·
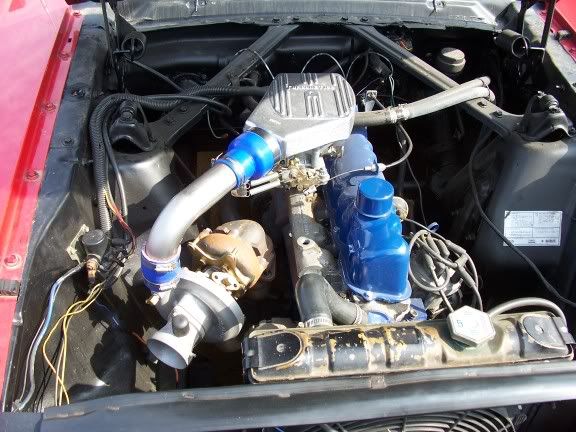
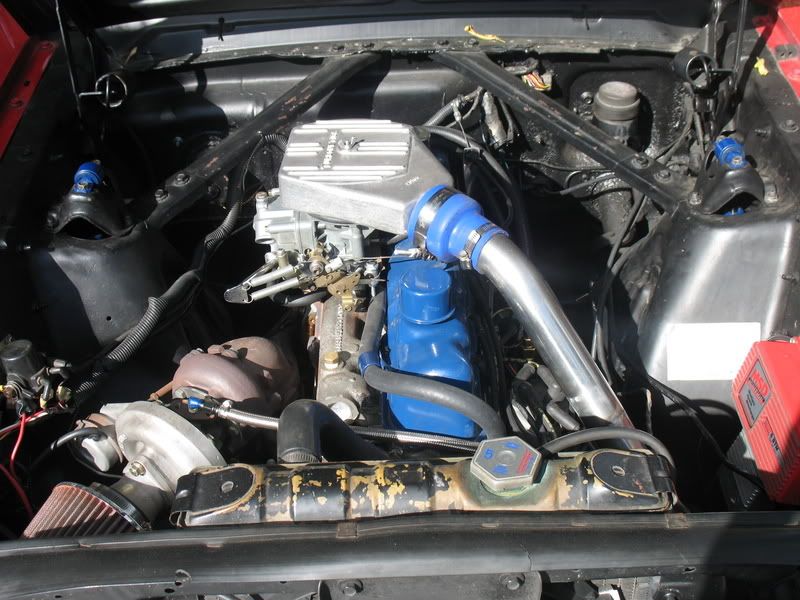
Hey guys, Im a newb to the forums (long time lurker) but Ive had my 66 since the late 90s (first car) and have been slowly messing with it since!!! Heres a mod breakdown off the top of my head:

1966 Mustang Coupe "Sprint" package
200 ci inline six BONE stock pistons, rods and crank
292 cam (oooold)
BIG log 250 head with valve springs for cam, milled for 2V carb direct mount
Holley 2300 500cfm carb by QuickFuel for blow thru
TE44 turbo
Front mount intercooler
3" downpipe split to 2.5" pipe to Flowmaster 40s dumped
WorldClass T5
Custom driveshaft
8.8 with 3.55 gears from Fox
Grab a trac 4 leaf, mid eye rear springs
New stock front springs with 1 coil cut
Shelby 1" UCA drop
17x8 TT2
245 BFG Sports

I ran the six stock all the way through Highschool then tossed a 2 barrel carb, dual header and MSD ignition with later model dizzy on it along with the T5 trans. Before graduating college the timing chain went and I took advantage of the tear down to build the motor up, forged pistons, cam, put a Buick GN turbo on and had quite a bit of fun. The original block cracked while putting a head stud back in around a waterjacket and I tossed in a bone stock, free 200 from a friends 67. Ive thrown more boost at the stock motor without issue thanks to learning a couple fuel, timing and headgasket lessons with the old motor :pirate: Fastforward to this month and Ive FINALLY and quite literally for the first time since the 2 barrel was introduced to the mix, got this sucker running like a normal car. It used to have a nasty lean spot that would stall the car out if you didnt pedal around it before which made day to day cruising a pain in the *** and launching nearly impossible. Ive done quite a bit of work learning and fixing the previous shop's mistakes and have it running like a dream. I almost tossed the entire setup in the corner and put together a simple 289/302. She's finally fun again and now Im lookin forward to throwing more time and money at her in the futue. Oh and as a side note, I sealed her fate by using it to ask the GF to marry me so now we BOTH agree that itll be around for quite some time :thumbsup: Here are some recent pics of where she's at now.
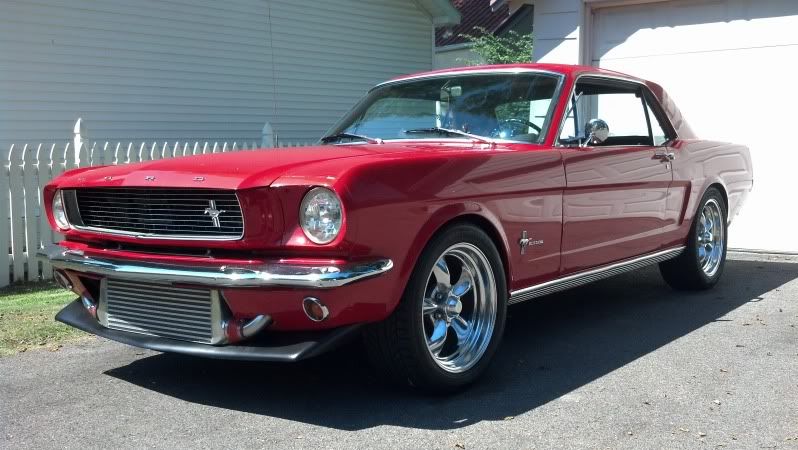
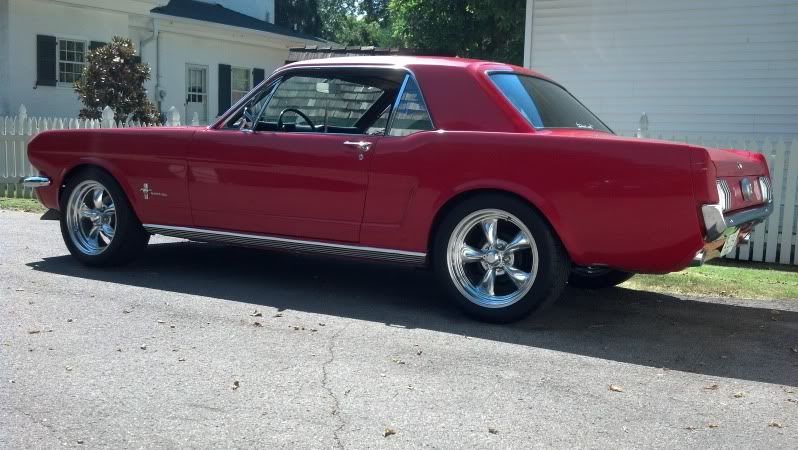


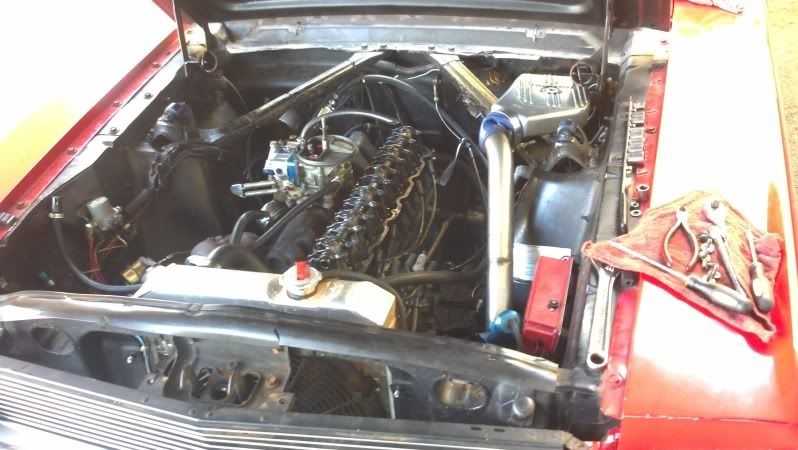
Valve cover off reseating a valve seal in Gatlinburg for Shades of the Past. Kinda shows the setup. Its dirty but it works and its a driver not a show car so I dont care. I need to clean it up, spewed coolant all over on the way up there lol


Im about to pick up some (free) E30 Recaros this weekend then Ill finally put a little more work in the interior. Love this forum and am back in love with the car so I look forward to seein what happens next!!!
Matt
 
#5 ·
is that air cleaner for show or is it supercharged?

that has a superb body on it.

you probably need a bit more air flow like better fan and 192 thermostat etc.
In the last pic the carb hat is removed so I could get the valve cover off. The turbo is hidden in the pic, it pushes through the intercooler then to the carb hat into the carb. As for cooling, its got a bigger aluminum radiator, electric pusher fan and new waterpump and thermostat. It USED to stay cool all day any day no matter what but lately not so much. Ive flushed alot of crap out of the motor and radiator and prolly need to do it again. I also realized the lean condition in the carb happened to be where I was at when cruising at interstate speed which Im thinkin caused the extra heat. Minute I dropped to about 60mpg or so she cooled right off.

What kind of grille and emblem does that have on it?

Love em'
Its a stock 66 grill with the pony removed and the shelby grill emblem added

That car is BITCHIN'! I've wanted to see a six with a blower for quite some time. Got any timeslips?
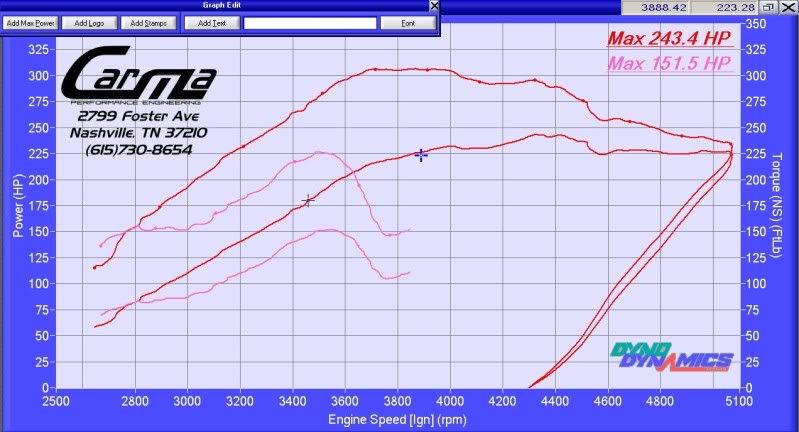
Best she's ran in the past was a low 14 thanks to TERRIBLE (high 2) 60fts cause by the lean stumble in the carb and the old open rear end. Fooling around on backroads she was nasty quick and spooked alot of people so long as I could pedal through the dead spot. Now it launches better and runs like a champ. Ill take it back out and try again when I get it dialed in better. She put down 240rwhp at 9:1 rich and just over 300tq. Im thinkin itll have mid 300rwhp once I lean it out a bit!

Matt
 
#9 · (Edited)
Heres the latest dyno before the 3" downpipe and new exhaust. First pull put down 151RWHP and was 10:1 rich. Leaned it out to 9:1 and almost picked up 100RWHP!!! If I can get it closer to mid 11s AFR Ide be able to see what she was really made of!


I run a dual boost controller set to 15psi and 20psi but when it counts I rarely run less than 20psi. The motor is bone stock so whatever the stock compression ratio is what Im running. Stock pistons, rods, custom cam, ARP headstuds and a FelPro headgasket seem to LOVE 20psi so long as you have plenty of fuel! Not entirely sure when the boost really hits but its not bad lag wise. It rolls in to 5 psi pretty steadily then it cracks over to 20 and hits you like a freight train. Its truely a blast to drive especially for bein an oldschool little inline six!

Matt
 
#24 ·
Heres the latest dyno before the 3" downpipe and new exhaust. First pull put down 151RWHP and was 10:1 rich. Leaned it out to 9:1 and almost picked up 100RWHP!!! If I can get it closer to mid 11s AFR Ide be able to see what she was really made of!


I run a dual boost controller set to 15psi and 20psi but when it counts I rarely run less than 20psi. The motor is bone stock so whatever the stock compression ratio is what Im running. Stock pistons, rods, custom cam, ARP headstuds and a FelPro headgasket seem to LOVE 20psi so long as you have plenty of fuel! Not entirely sure when the boost really hits but its not bad lag wise. It rolls in to 5 psi pretty steadily then it cracks over to 20 and hits you like a freight train. Its truely a blast to drive especially for bein an oldschool little inline six!

Matt
HP is for show but torque is what makes you GO.:burnout:
Am I reading right, Bright red is Torque? DAYUM, look at that curve.
 
#10 ·
Nice work! My first car was a 65 coupe 6 cyl.. I want another one but a stick this time.
 
#13 ·
Before the turbo, the manual trans swap was the BEST thing I could do to the 6 to make it more fun to drive!!!

I plan on adding a turbo to mine. I have a Classic Inlines head and intake. Keep us posted as you keep making it better.
Shoot, Ide kill to have that head and a better intake! Im making decent power on the 70s style big log, cant even imagine what it would do with a better setup!!!

Increasing hp and more giddy up equate to going faster and you're still using a single master cylinder.
Thats an old pic, but yes I ran around for the longest time on the stock 6 banger rear end, brakes and glass jar master cylinder. Now it has a maverick dual master cylinder and an 8.8 rear.

Matt
 
#11 ·
I plan on adding a turbo to mine. I have a Classic Inlines head and intake. Keep us posted as you keep making it better.
 
#17 ·
Yep, before I put the 8.8 in I was 5 lug front (granada swap) and 4 lug rear so I rocked steelies and cheapo tires till I was able to put together the rear end and a good set of wheels and tires. I kinda liked the steelie look but I love the way it sits and looks now!

Matt
 
#16 ·
I cruised it to the show and back but never enter the actual show. I usually park it in the big grass lot across the street from DollyWood/Splash Country or whatever its called. It can be seen all over the main drag in Pigeon Forge tho all weekend of the show, THATS where the fun is for us!!!

Matt
 
#18 ·
#19 ·
Those Aussie motors put down some major power too with the right mods!!! Im enjoying this little motor alot tho, really turns heads. If I keep with it Ill prolly eventually toss a better head on with removable intake and built a turbo header for it! Till then Im gonna get the carb happy as it sits then enjoy cruisin it around this Fall!

Matt
 
#21 ·
Yeah man, it really does. I have people swear its a V8 till I pop the hood, I see people (especially import guys) double take when they see the intercooler or hear it whistling. At the track it used to be a chore to launch so I was SLOOOOW but Im hoping thats all changed now, but on the street just goofin off it would spook a ton of people. Most memorable was QUITE a few years ago a nice red HiPo 289 coupe pulled up next to me and we got to talkin. Light went green and we both hammered down thru first and part of second (for me at least, speed limit was 45 didnt wanna go much past it) and I was WAY out. He hollered at me when he caught up about it bein a nasty six and gave me the thumbs up. I knew then I was onto somethin. Its MUCH quicker now and with a little more tweaking I think ill have it much more pleasant to drive around town as well!!!

Matt
 
#22 ·
#27 ·
I am very impressed here! Do you have any videos that you can share with us?
I do somewhere around here but they all are pretty lame. Track videos of me tryin to get the carb to be happy on launch (and failing) and some exhaust vids.

Heres my latest exhaust vid (if it works). Yes, the camera falls over but you can still hear it as I fire it up and drive it into the garage.


Ill grab some better ones once she's running better!

Matt
 
#26 ·
Ha thanks guys, yes its a torquey little motor for sure!!! I am a member of the TurboForums and they have helped me beyond belief lemme tell ya!!! Im hoping to up those rear wheel numbers here shortly after leaning the entire thing out...then maybe I wont stink after driving or smoke out the cruise spot (unless its white smoke from the rear rubber lol)!

Matt
 
#28 ·
Havnt updated this thread in a while...mainly because I kinda forgot about it :eek:

For those that wanted a video, here is the new exhaust setup. 3" mandrel bent downpipe to a 3" electric cutout (no video of it open but its awesome) split to dual 2.5" Flowmaster 40s and then 2.5" over the rearend and dumped at the valance. Sounds alot better, doesnt make my ears bleed anymore and the drone from when it was dumped to now is night and day better on the highway! Doesnt sound bad to me!

http://youtu.be/qFZCPJx8D6s


Ive finally got the bug again and have gotten back to work on the old girl! Heres a quick catch up to today.

Cleaned up the interior a tad, added a new steering wheel, shifter and A/F gauge. Now all I need to do is tear it all apart, fix floor pans, add sound deadening/insulation, new carpet and have the seats redone.


Built a battery plate to better secure the battery in the trunk and then build a bracket to hold a toolbox on the opposite side. Everything is super secure and I gained some trunk room back by moving the toolbox!


I also took a crack at sorting out some rust issues. First time welding anything important...not the best but easily hidden and it did the job! Im addicted now as well!


Also made myself an office chair. Sittin in it as I type LOL


Matt
 
#29 ·
Ive also sorted out the ride height issues. I kept noticing that the rear passenger side seemed to sag a bit and it was annoying me. I did all I could to make sure the leafs were mounted right and everything was right to no avail. It wasnt until I went to lower the front a tad that I noticed one of the thin rubber spring isolator pads on the perch was missing on the driver's side. One of them, not both just one. I took one that was left off and took both off the pass. side and lowered the car to see what happens and Ill be damned if it wasnt level as could be all the way around. Go figure. I cut a little more off the springs to lower it some and made my own insulators so it would be even and now everything is happy. I tossed 1" lowering blocks in the rear and Im not back to being in love with the stance again. I will admit that Im a moron and forgot to get a pic of the new stance but I will get one soon.


I wanted to get to a dent in the roof and try to hammer it out so out came the half way ripped out headliner and insulation. There was some surface rust going on so I sanded it out and painted it to seal it up nice. I have some insulation paint I will add thats similar to Lizard Skin but Im gonna wait till warmer weather before I apply it.


This leads me to my latest BIG project. Ive finally got the cash, time and give a damn saved up to tackle something that has kinda bothered me since the day it was added to the car...the front intercooler/valance area. Originally I wanted a GT350R front valance with the intercooler behind it but being a silly kid...I ordered too big of an intercooler without realizing the valance leaves very little clearance where it connects to the radiator support. With that being the case, we cut the lower valance and made room lol. I wasnt happy with it so I cut and modded a lower spoiler to tie it all in and liked it more but was still never 100% happy. Dont get me wrong, it looked mean and stood out in a crowd but never really fit the clean look I was going for in the end.


After getting the stance ironed out I decided that enough was enough.


Out with the old, time to order the new. I measured and measured and measured and got an intercooler core that would fit the bill. I also decided to flip the intercooler so the piping and inlet/outlet were at the top running behind the bumper brackets which helped add some room. Im gonna toss the 2" mandrel piping and go with 2.5" this time as well! The new intercooler is shorter but just as wide from tank to tank and wider front to back so Im not going to lose anything performance wise. New intercooler, valance and stone gaurd were ordered and I got to mocking everything up. Ended up having to cut the lower radiator support open to gain some clearance so I boxed it up and painted it all black to protect it from rust.


Mocked up the intercooler and got it mounted.


Clearanced the area under the battery tray in hopes that the intercooler piping will fit over here. Its gonna be close. I welded up the panels real fast and sprayed it black.


Tossed together some braces to help support the hood latch. Its pretty solid now, even more so when the grill is installed.


Matt
 
#30 ·
I then jumped on the part that had me most excited and most worried. I havnt done alot of body work and this was all new to me but I jumped in feet first figuring the worst I could do is screw up a cheapo valance and order another. Measured, taped, measured, thought about it, measured some more and got to work.


Came out ok...but I didnt like the sharp turns nor did I like the angle coming down from where the bumper would be so more measuring and taping later I was back at it.


Subtle...but exactly what it needed to look right to me.


Now the fun part...bridging the gap and adding a lip to the opening. First I cut out the lower part and started tacking, bending and tacking till it was where I wanted and solid.


Then I moved to the sides just to add a more finished look


LOVE it!!!


Looks even better with the bumper on


Skinned it in bondo to smooth it all out so the final paint job doesnt show all the imperfections and ran into a small issue. The pass. side bend had a crack where the two pieces were welded together from the panel twisting while handling. I cut the bondo away and welded a thicker piece of metal in and smoothed it all out. Now it appears to be solid and another coat of bondo added.


This is where Im at now. Im praying I can get this bondo work done cleanly and it will look good in the end. Im gonna then prime it and send it to a painted to get sprayed to match the rest of the car. Once Im done with it Im gonna move on to fabbing up the intercooler piping! Cant wait to get this thing back together and out of the garage!

Matt