Vintage Mustang Forums banner

$200 Disk Brakes Anyone???

14K views 49 replies 26 participants last post by  latamud  
#1 ·
$200 Disk Brakes anyone?

First I would like to clarify that I cannot and will not take credit for this. I first read an article on Ford Muscle by my buddy F15Falcon. Here is his tech article.

Cheap Big Disc Brakes For Mustang/ Falcon - FordMuscle.com Forums

I did stray from his plans a bit but not much. I will do a complete write up once I finish so I will just outline plans for now. Here is my progress so far.

I will finish with 11.5” disk brakes for about $200 when all is said and done.

Image

Image


I started out with big bore GM calipers. I know GM parts on a Mustang is a deadly sin, but at $12 a pop with lifetime warranty, they are hard to beat. They have a 2-15/16” piston and come with caliper bolts.

Image

Image

Image


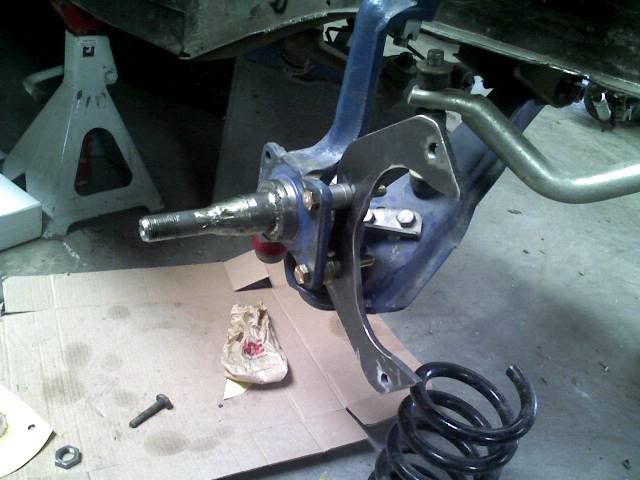
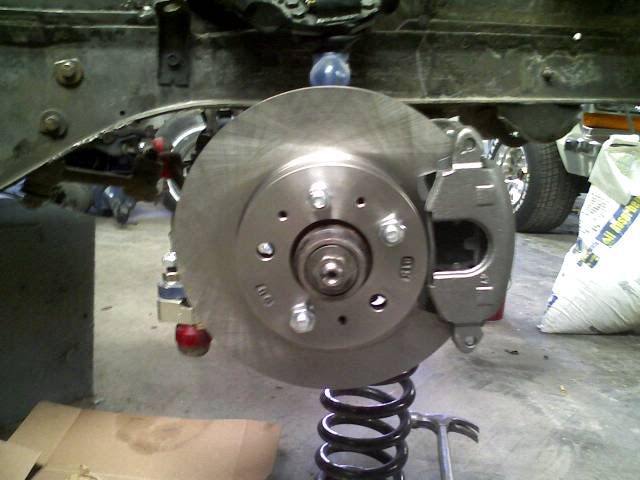
I chose to re-use my stock drum hubs and try to use bigger rotors both in diameter and thickness. I pressed the hubs out of the drums, and studs out of the hubs which was no easy task. I then mounted the hubs back on the spindle for some measurements.

Image


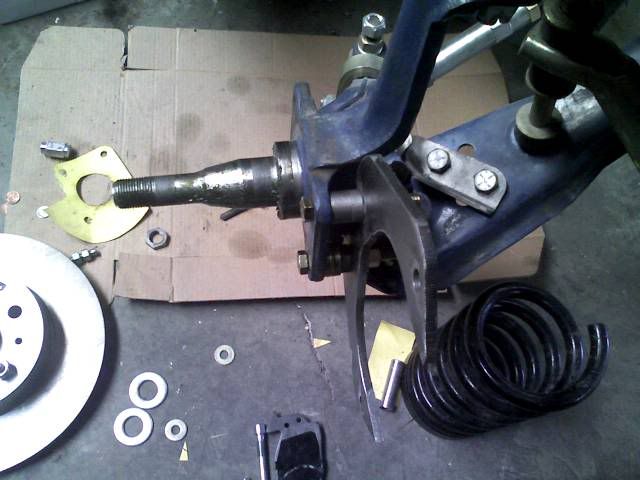
I originally had planned to use Wilwood hats and rotors for desired rotor offset but they were $80 per hat and $30 per rotor and that would have killed my budget.

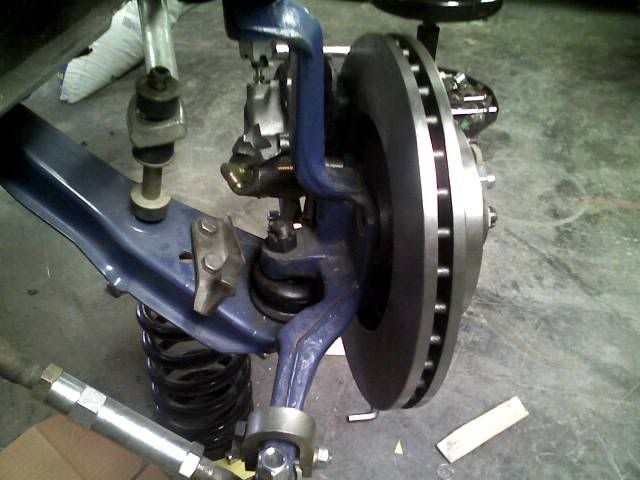
I found the sweet spot at about 1.5” of offset. I didn’t want the caliper too far back or out so it would not interfere with either the wheel or the sway bar.

Image


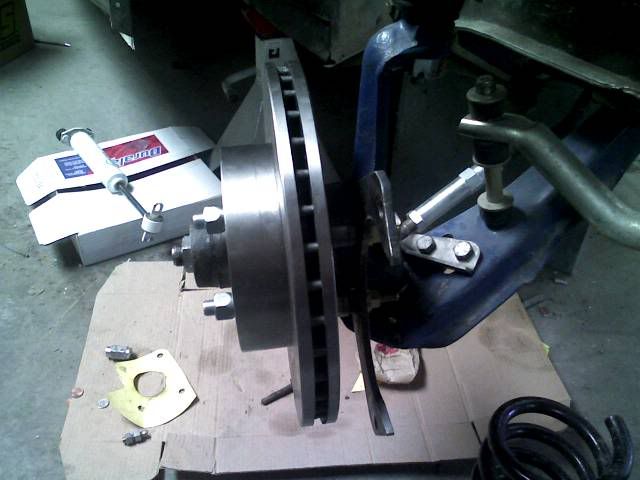
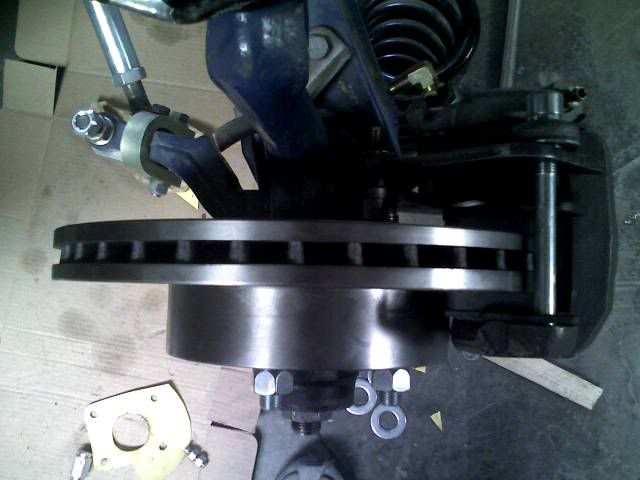
I figured there had to be a factory rotor that would fit my needs. My first try was a 97 Mustang but there was too little offset. My next try was a 95 Crown Victoria front rotor and I nailed it on the head!!! 11.5” diameter, about 1.5” of offset, 1” thick just like the GM rotors, and a 4.5” bolt pattern. They run about $35 a piece.

Image
Image


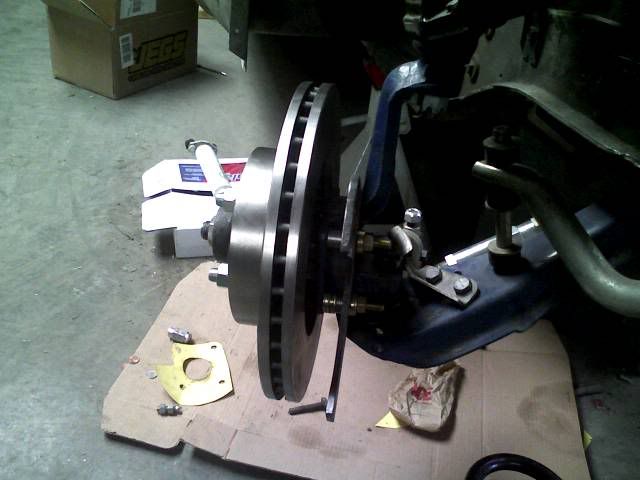
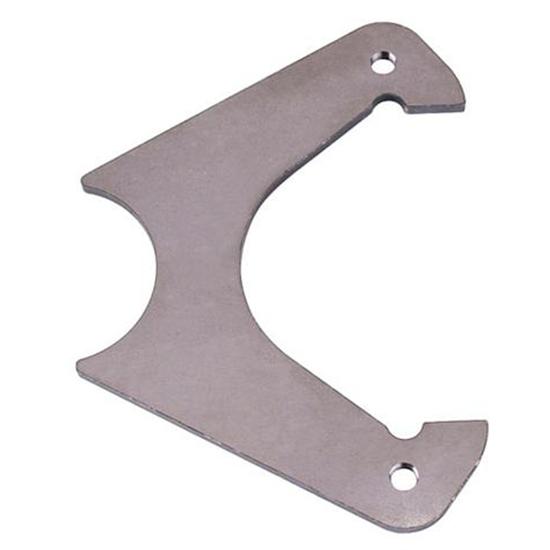
These rotors will require a little bit of work to make sure they are centered on the hub, but that will be easy and won’t cost hardly anything. Next, I will be ordering caliper bracket from Speedway Motors for $10 a piece, some fittings, and stainless steel braided hoses.

Brackets
Image


Fittings
Image


Hoses
Image


So the tally:

1975 Chevy Impala Calipers: $12/each assuming you provide cores. $24
1975 Chevy Impala Brake Pads: $20 w/ lifetime warranty
1995 Crown Victoria Front Rotors: $35 each. $70
Speedway Motors Big GM Caliper Brackets: $10/each. $20
Speedway Motors Fittings: $8/each. $16
Speedway Motors Stainless Braided Hoses: $11/each. $22

Total so far: $172 plus I will still need some bolts and spacers which shouldn’t be more than $25.

Hoping to get more done on this in the coming days but with the holidays and shipping, it’ll be more like 2-3 weeks before I can get this done.

Fred
 
#3 ·
Could be just me, but the mounting brackets don't seem quite as robust as I'd like for the application.
 
#5 ·
And that is where my approach will differ a bit from the original one. Once I get the caliper mounts in I'll start looking around and trying different stuff. Although, F15Falcon did have a mechanical engineering friend of his run the numbers and he determined that two bolts were more than sufficient and three was way overkill. These brackets are made 5/16" steel which is damn beefy.
 
#6 ·
Well, I have two methods in mind. One would consist of having a centering ring made. I would run the hubs and rotors down to a machine shop and have them make the rings. The second method and probably the one I will follow is this:

These rotors have three holes which are threaded in between some of the stud holes which you can see in this picture:

Image


I got three new studs into the hubs and used acorn style lug nuts to clamp the rotor to the hub. Once I did this, the hub looked very centered on the hub. I will confirm this using a caliper or shims or something. Once it is determined that the rotor has been centered, I will use a transfer punch to mark the holes that need to be drilled on the hub. I will drill some slightly oversized holes on the hub and reassemble the hub and rotor so that is centered again. Once it has been re-centered, I will use three bolts with thread locker from the backside of the hub to keep the rotor in place. More work, but will only cost me the price of the bolts and thread locker. I'm sure pictures will help.

Fred
 
#7 ·
Might be a little easier to to do what OEM's do. Off the top of my head, 1980's-90's VW Rabbits, Jettas, and such for example.
Drill one hole a bit bigger and give it a chamfer. Drill and tap a matching hole in the hub. Then simply use a big chamfered phillips screw to hold the rotor to the hub. The chamfers should be matched so the screw will fit flush. Such a screw will need to be installed and removed with an impact driver.
Every such OEM implementation of this I have seen uses just one screw. But certainly three would be better.
These screws are cheap from VW but for some reason aren't widely available anywhere else. I've seen them used on Hondas, Toyotas, or something else too but can't remember exactly what.
 
#9 ·
Maybe a torx type head? Could the studs have a longer shoulder to extend into the rotor and help center it?
 
#10 ·
A philips head lends itself more to the application because of the tapered (chamfered) bolt head. A couple million cars were made with these bolts securing the rotors and a stripping the heads is mostly a result of someone not using the correct impact driver. That said, I have seen some on other vehicles that use torx instead.
I'm thinking the easy access from the front beats fiddling around from the rear but that's just me. Incidentally I own one of the million VW's that uses these screws on the rotors. I thought it interesting that if I pull the caliper then remove the screw the rotor will literally fall off the car. With most applications that don't use a locating screw, you usually have to knock the rotor off because it fits so tightly around the hub. So I have no doubt that without a tight hub fit a locating screw/bolt (or three) is indeed the correct way to go.
 
#12 ·
"I know GM parts on a Mustang is a deadly sin." Heck, there probably made by "Bendix". You are forgiven.
 
#14 ·
Some cool work there...I didn't think F15's idea with the Granada rotors was unique enough to warrant all the work, but the Crown Vic rotors are a cool upgrade.

I'd forgotten about it until a month or so until I got to talking with a guy on another board about "weird" brake setups....this has been done before; a lady VMFer made her own brackets years ago for small GM calipers and 95 Vic rotors.

We did a little digging, courtesy of a Raybestos catalog and found 2 LARGER Crown Vic rotors, one of which is 100% identical in every other way to the 1995 units. A 1998 Crown Vic rotor is spec'ed at 12.42" and 1.10" nominal thickness. It would be really cool to see that crammed under a 15" or 16" wheel...heck, the thickness is up there in the same range as the 60s T-bird brakes and rotors are only $30ea and those particular GM calipers are huge and cheap :D
 
#15 ·
Why not just use late model Ford 13" rotors and calipers, like I did on my 65 fastback?
 
#16 ·
I think he's trying to fit them under 15" rims, the 13" rotors require 17" min. rims. The 13" rotors are also much shallower so a deep dish wheel won't fit w/o hitting the rim either.
Jon
 
#21 · (Edited)
Mtrain, that is a very good way to go with that set-up you've got there. I would have never though that stuff was so inexpensive at an auto parts store. I'd be interested to see how you went about mounting those calipers.

Your idea may be enough to convince me to look for a set of 17" wheel I like.

Fred
 
#22 ·
The mounts for the calipers were easy. Just make your first one out of something easy to cut like plywood.

This way you can drill several holes to get the clearance of the caliper to rotor where you want it.

Then when you get everything straight use the plywood model as a template onto a 1/4 piece of steel. If you don't have the tools to cut the steel go to a welding shop and have them cut it {just make sure you drill the mounting holes so you know their right}.

If you end up too far in, or out with the calipers just use some washers for shims.

Thats about it...........
 
#25 ·
Master Cylinder

What about changing the master cylinder? Are you making this work with the stock drum master cyl? All of the kits include that as well.

Deviousfred did you ever find a way to mount the caliper bracket?

A combination I've used on race cars a number of times is the big GM caliper, Pinto spindle, and Granada rotor. In that case there is a caliper bracket that bolts right to it. The bracket you have looks like it was originally designed to be welded to a 9" rear axle tube.
 
#26 ·
Fred, Like this thread a lot. Good job explaining the build. Looking forward to more from your Mustang build up.
 
#27 · (Edited)
I'm in between projects and a deadline presented itself for one of my other projects so this one has been put on the back burner. I will be getting some more work on it in the coming weeks. As far as a master cylinder, I'm still working on it but I do not imagine it will be more than $20-$30.

CSX, thanks, I'm working on a nifty little export/monte carlo brace that should be coming together as soon as I get some brackets back from the welding shop. Will have a complete write-up on it soon.

EDIT: BTW, if you're wondering what the other project is, it looks a little something like this.

Image
 
#29 ·
I was actually going to go with that exact combo when I got the truck but got a hold of a 5.0 and C4 so I decided to go that route. It's getting plated kingpin I-Beams, FOA coilovers, heimed radius arms, a 9" rearend with a spool, wishboned 3-link, and a full cage.

Fred
 
#32 ·
I don't mean to put down your project but I just don't think that mounting bracket is going to be enough for all the force that's going to be applied.I know you want to do a budget build but this one area I think you should spend the money.
It's kinda like that astonaut that said to the other one" you do realize we're up here on the cheaspest govt bid don't you.
 
#34 ·
I knew I shouldn't have said anything. I'm just concerned that 1/4 mild steel (as it looks)
is not going to withstand the forces that it will recieve when 3300 lbs or so are forced on it when trying to stop. The aftermarket one's that I'm familiar with look to be more beefy material.I think you would need something like 3/8 steel and a design that would include 4 mounting points. But what the heck do I know, i'm just going by what I see other suppliers offering. Just take care and be safe.
 
#36 ·
I also agree that this mounting is looking scary. There are many forces involved here, and it would take some serious calculations, to put my mind at ease. Perhaps a better design, and more robust bracket should be used? Whatever the case, I like your end goal...... except for the Chevy parts. LOL
 
#37 ·
Well, to be honest I shared your concerns before I began this project. I was unsure of strength of this bracket compared to the more common ones we have seen. Then I looked at some of the more popular designs and noticed they too were mounted to either 1/4" or 5/16" steel or aluminum at one point in their design. Granted the rest of the bracket was super beefy, a system is only as strong as its weakest point. Also, I'm unsure if you guys read the part where the bracket will have a third part to it that connects to a third mounting point on the spindle. Kind of like this:

Image


Image


I have seen designs similar to this bracket working on many cars that are driven hard with out a single problem. Time will tell.
 
#38 ·
The thickness of the plate is not so much of a concern as the distance the spindle mounting tabs are to the caliper mounting points and they way you are attactching the plate to the spindle. This distance on such a thin plate, but more importantly, mounted the way it is will cause the caliper to flex.

Adding that hockey stick shaped piece to the top and bottom would help but still may not be enough to increase the stifness to an acceptable level.

Those brackets are designed to be welded to a rear end axle tube. The increased length of the welded area and the reduced braking load is what makes them suitable for that application.
 
#39 ·
I have been installing that same bracket on the front of cars for more than 20 years now and have never had a problem, most of them were on short track circle track cars that severely abuse the brakes weekly . I have that same bracket installed on the front of my 3800 pound road racing '64 Galaxie using only two bolts instead of three with no problems. I have also installed dozens of Wilwood disc brake kits that use an aluminum bracket held on with two 3/8" bolts. Like Deviousfred mentioned, I had a friend of mine run the numbers on the bolts and the brackets, and he fudged the numbers considerably (like an 8,000 lb vehicle weight, and 40" tire diameter etc.) and the brackets were still by far adequate for the task.