Vintage Mustang Forums banner

Crane's 1968 Gold Nugget Restomod

45K views 178 replies 45 participants last post by  crane550  
#1 ·
Someone asked me to come share on this forum, so I thought I would give it a shot. Most of the first page posts will be catching you up on what I have done so far. Please forgive the copy/paste nature of it.

I have had this Mustang for about 4 years, but have not really had much time to work on it. Starting my business kinda took priority, and now that it is going I can turn my attention back to the car. Here are some images I took shortly after I bought it.

Image


Image


I drove it for about a year, and then started tearing it down for a full restoration.

Here it is at a car show (with my wife and I) just before teardown.

Image


Bought some new tires for it....these were $10 each off of Craiglist. The tires themselves need replaced, but the rims are great and cleaned up nicely.

Image


Image


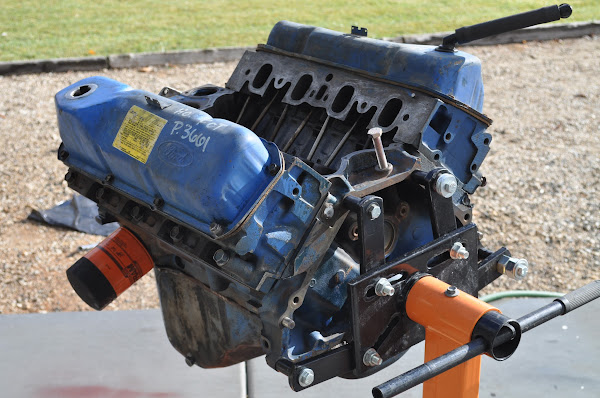
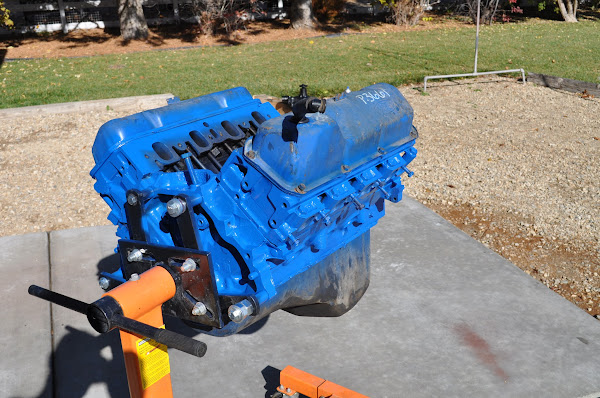
I installed a new rear end to get up to a 5 lug system, plus this diff is a lot stronger. The car came with a 200 inline 6. Had to go, in favor of a V8. (No hate now)

Here is the installation of the new diff:
Image


Image


I wish I had better before pics...but here it is after installing the new differential, tires, and springs. The stance is so much better. These girls start to sag in the rear after they turn 40, and this helped a ton.

Image


Image


More to come.
 
#2 ·
This is old info, but will help you get caught up...

Now I just wanted to say a few words about my plans with it.

After seeing a '65 at a car shows with Heidts suspension I was hooked, and got that kick-in-the-pants motivation to get going on this project again. Plus my HOA is not liking the car in the driveway, so it is time to move it inside and giver her some love again.

Originally I was planning a 331 stroker, because I really wanted to do something different then what everyone else was running, and the concept seemed fun to me.

Then I found a local 351C that runs for $400, and I could not resist. I really want to run the 351C for various reasons. Most of it has to do with good memories working on one with my dad when I was a kid. He really liked the engine, and built a very powerful Cobra Jet. It was a power house, and as much as I wanted it (might have even killed for it) he wouldn't give it to me. Anyways, right or wrong, the idea of a 351 Cleveland has always been a muscle car staple, at least in my mind. Some people do not like them, and thats fine. I just see them as a very good breathing engine, with a strong lower end.

After looking into the different suspensions systems, I HAD settled on TCI since they seemed to have the most rounded and quality kit out there. Plus the way they install appeals to me...except there was a problem. Their IFS kit is NOT compatible with the 351. I actually found this out this morning when I called with my debit card # to order the parts. Back to square 1. After looking at different kits I found RC Motorsports has a kit made just for the 351C. They were in the running from the very beginning as far as IFS kits go, so it looks like I will be switching to them at the last minute. I have not called in to place the order yet, but it's looking imminent.

Here is a video that I found early on in my looking featuring the RC kit.


I will need a custom oil pan, which they sell for $360. Total price will be $3200 give or take, but that is supposed to include everything except the power brake booster. This includes power rack too.
 
#3 ·
Pulled the trigger on the 351C and Rod & Custom suspension. The engine is in my buddies garage, and the suspension is a week or two out. They told me a lead time of 10 days.

Anyways, thought some pictures would help show you where she is at! Also showing some of the body work needed. Actually, what is pictured is the worst of it.

Image


Image


Image


Image


Image
 
#4 ·
No little kid in the history of the world has been as excited as I am right now!

Santa came two months early in a big brown truck! Here are his gifts! We are officially behind schedule now... parts came earlier then expected and I still have not made it to the sand blasters....

The fun continues!

Image


Image


Image


Image


Image


Image


Image


Image


Image
 
#5 ·
Moving along now. I had the engine bay sand-blasted. This will make it easier to plasma-cut out all the old stuff, give us a clean surface to weld to, and make paint prep a lot easier for the engine bay.

Image


Also found out some exciting news. At is turns out, this Mustang is a special edition. Thanks to the folks who suggested it might be. After a little digging, it turns out it is indeed a Gold Nugget Special. Anyways, that kinda changes a few things. The vinyl top will definately go back on now (which I do not mind, now. It has grown on me.)

Anyways, here is the proof. Looks pretty conclusive.

Image


It would be a shame to paint it another color and remove the top at this point. There were only 480 made, and all were sold in the Seattle/Oregon area.
 
#178 ·
Moving along now. I had the engine bay sand-blasted. This will make it easier to plasma-cut out all the old stuff, give us a clean surface to weld to, and make paint prep a lot easier for the engine bay.

Image


Also found out some exciting news. At is turns out, this Mustang is a special edition. Thanks to the folks who suggested it might be. After a little digging, it turns out it is indeed a Gold Nugget Special. Anyways, that kinda changes a few things. The vinyl top will definately go back on now (which I do not mind, now. It has grown on me.)

Anyways, here is the proof. Looks pretty conclusive.

Image


It would be a shame to paint it another color and remove the top at this point. There were only 480 made, and all were sold in the Seattle/Oregon area.
Image

I'm your older brother:

Image
 
#6 ·
We got the shock towers out, and started to remove the little brackets and misc mounts that need to go. It didn't take too long with the plasma. While my buddy Richard worked on the frame, I cleaned the engine and started prepping it for paint. We should be ready to install the cross member by Thursday. Then comes painting the engine bay!

Alex

Image


Image


Image


Image


Image
 
#7 ·
Richard finished cleaning off the frame rails, and we got the crossmember tacked into place.

Image


Image


After verifying everything was correct, we welded it in. Richards welds look really good- although not as good as the R&C welds- those are phenomenal.

Image


Image


Image
 
#8 ·
After the crossmemember was installed, we installed the covers to fill in the hole from the shock towers. My approach here is a bit different then the way some others have done it.

I cannot afford a concours restoration, and my Mustang is made to be driven. Also, the amount of money being sunk into the R&C kit is significant for my budget. It's also something that will be one of the cars highlights for me, and something I will likely want to show off to others when showing my car. Anyways, I do not mind folks being able to see where the shock towers were removed. Not that I want it to look hacked or sloppy, but welds showing is not an issue for me. Anyways, Richard has the sheet metal experience, and he welded it up nicely for me while I continued working on the engine.

Image


Image


Meanwhile I worked on spiffying up the 351C. I am not doing a full rebuild, but am giving it new paint, new outside seals, and overall a very good cleaning. I do not see the need to completely rebuild it now, as the guy who sold it to me told me it runs strong.

I cleaned up the intake manifold. A sand blaster restored it to glory.

Image


Image


Finished cleaning the engine

Image


And paint. The valve covers and oil pan are being replaced, so they did not get painted.

Image


Last order of business for the day was to primer the engine bay. As it turned out, our luck was rather bad. The weather was beautiful all day long, and from the time we pushed the car outside, mixed the paint, and started spraying, it turned nasty and poured rain. So we threw away the mix, pushed the car back inside, blew the water off, and what do you know? Sunny again.

Image


Image


Despite our bad luck with the weather, all in all it was very productive day.
 
#9 ·
Good news and bad news....

First the good! We got the A arms, spindles, and brakes set up today. It went together very smoothly without issue. I have to say I am very happy with the kit.

Image


Now the bad news: When installing the new pickup tube for the oil pump, I needed to remove a main bolt to replace it with a main bolt with a stud, to secure the pickup tube in place. Since I had to take the main bolt out, I decided it would be just as easy to remove the entire cap and inspect the bearing.

Wish I would have done this sooner.

Here is what I found:

Image


Too bad. Yesterday I just installed the entire top end! Ugh. Oh well. Time to tear it completely down. Actually, I am seeing this as opportunity: PERFORMANCE UPGRADE!

So now the task is to find out how to get a bit more juice out of the motor. Not sure what the plan is yet. I already have an Edelbrock intake and carb with my 2V heads, so I think I might stick with that. Perhaps a cam?

Tell me, what would you do if you wanted a good 2V 351C?

Alex
 
#10 ·
Brought it back home today! Looks great! Richard installed the sway bar, spindles, disc brakes, and calipers and put the wheels on. The alignment is visibly off, but that can wait. Next step is to get the engine ready. Unfortunately it looks like I need a full rebuild at this point.... Bummer. Still, this is an opportunity to add a few more ponies, freshen it up, and prolong the life of the engine. This way I know it is done right.

Here is the engine all pretty and painted, before I found out it needed a rebuild. Guess I should have checked sooner! This is what the engine looked like before I found out...

Image


Here she is being loaded on the trailer:

Image


And some more of the new suspension:

Image


Image


Stay tuned! It is about to get MORE interesting!
 
#11 ·
I keep making progress! The new engine is looking great! All these pics of the engine are NOT the same engine as before...this one is newly rebuilt, a 4V 351c, with a few nice little upgrades. BUT, I found it extremely boring. I painted the water pump, sandblasted the intake back to aluminum, and swapped out the pulleys and balancer for the ones I already painted.

Before:
Image


After:

Image


Image


I cannot overstate how pretty this engine is. The pictures do not do it justice. I am still having a hard time wrapping my head around the fact that it is mine.

Anyways, I am also working on getting the steering column ready. I choose to rebuild mine instead of buying a new one. It is going well, but just takes time. My new steering wheel should be here soon too. I hate that I have to wait until I complete this to install the engine, but I need to get the steering in before I install the brakes, and I don't want to put the engine in until the brakes are done.

Image


Image


Image


Image
 
#12 ·
Got more work done today. I have got all my front brake lines bent. I am working on getting the under side of the car spot free so I can spray undercoating, and then I am going to install new brake lines to the rear drums....or I might just re-use the old lines. It's a 3/16 line and I would install a 1/4" one, but then again they are just drum brakes and most of the stopping power is in the front brakes. New disc brakes might be in order for the rear- eventually- but it can wait for now.

Image


Image


Image


And just because the engine is sooooo pretty I will show another picture of it.

Image


I did run into another snag today....this might be an expensive one. I bolted up my flex plate and torqued it to spec, and went to throw on my torque converter only to find the hole spacing was completely off.

I measured the spacing on the flex plate and it reads 9.375, and the converter had a stud diameter of 11.something. After doing some research I found I do in fact need anther torque converter...and it's not the $99 dollar one at Autozone. I have only found 2 places I can actually get one. One it at Summit Racing, and the other is by a custom builder here in Boise. Both run about $530. Ouch! I am leaning towards the custom builder because he can get it to me by mid next week- but still does anyone have any better ideas?

Another reason I am leaning towards the custom guy is he can build mine to fit my car. After doing some research I found that with my Comp 290H CAM and the generally high RPM power that the Cleveland makes, a 3000 stall would be about right for driving around town. He even seems to think that my motor might be overbuilt (or at least have a bit too much cam) for a daily driver, and is saying this one leans more on the "sport" side.
 
#13 ·
Worked on the Stang some more today. I accomplished a lot. Seems that the same amount of work equates in to less bolts actually turned, less surface area painted, fewer parts polished, etc... More time means less payoff. Either way, it is still rewarding.

Spent the first half of the day spraying undercoating on the underside of the car. Sorry no pics. I wanted to get the underside taken care of before I put in my brake lines to the rear. I don't want them painted with the undercoating. Weird, I know, but it would bug me if they were.

Anyways, my headers came in the mail today. I send the 2v ones back that were for the old engine and got these for the 4v. Dallas Mustang was EXCELLENT about taking the old ones back and shipping me the new ones. They even ate the shipping to have the new ones sent out and all I paid was the price difference for the product and return shipping for the 2v heads.

The engine looks more complete with the headers on it. I think I am going to put the whole thing in as a package- the engine, headers, and tranny. It seems like less time hunched over an engine bay, which sounds appealing to me. That plan might very well change once I try...who knows. Without the shock towers in place it should be no problem.

Image


Also worked on the steering column again. I just ordered a new housing for it after I jacked the old one up. Honestly I don't think the $525 is worth it to upgrade to the iDidit column, so I just stayed with this one. iDidit makes a great product, but I would rather throw the money elsewhere right now. A new collar off of eBay got me going again.

A bit of chopping was needed to get the old shaft in for the steering column, but over all it was not too bad. I followed the directions and created recesses for the set screws. Having my steering linkage fall off while going down the road just doesn't seem like an option to me.

Image


Cleaned up the existing mechanism. If I remember right it worked fine, but if I need to replace it, it would not be too hard of a job later on.

Image


Reassembly.

Image


I have no clue what I am doing here...but it is a ton of fun! I am really enjoying the process! Looking forward to the day I can drive this beast...
 
#14 ·
Well the engine is IN. I would like to say it was a super easy process...it was not. I thought it would be better to put the engine and transmission in as one unit. I am rethinking this now. It would probably have been much easier to install the engine first and the transmission later. The whole assembly is so long that you really have to tilt the engine so the transmission is pointing down at a big angle-which is a pain in the neck. We used a leveler, which was probably necessary but still tough. I did end up scuffing my firewall a bit, but at least only in areas where it is covered. I don't think anyone will ever notice it but me.

Unfortunately I was fighting the weather. Just as we were getting it lowered into the car it started to rain and snow and we had to call it a day.

Image


I was a bit disappointed to see that my pretty valve covers conflict with my brake booster. They just barely rub, so it probably wont be a huge deal, but it was kinda a bummer. I might have to get covers that are not quite as tall, or figure something else out.

Image


Image
 
#15 ·
Well, that should pretty much get you caught up to where it is right now. I just finished dropping in the engine, and now am working on getting fuel lines run, hoses connected, and exhaust set up.

The hooker headers I bought do NOT work with my Rod and Custom rack and pinion steering. The tubes on the drivers side go right through where my steering linkage is supposed to be. Can anyone recommend some headers to work with the 351C 4V and rack and pinion steering
 
#16 · (Edited)
Great work! Takes me back about a year and a half when I was installing my R&C suspension. What's the timeline on this project?
As far as headers, you need something matched up for a Fox body Mustang. Look for Cleveland to Fox conversion units. Everything about the R&C lines up with Fox accessories.
Here you go:
http://shop.holcombmotorsports.com/...P-HEADERS-HED85620.htm;jsessionid=1B5FD98177B1959C3AF3E11E23E7C77E.qscstrfrnt02

Now, I will warn you of one thing I have discovered. Even though the Fox parts fit the steering linkage, I'm attempting to use Fox shorties and H pipe ( on my 5.0) and things hang a little low so I'm going to have to cut and shorten the H pipe. So the headers might be a little low, so keep in mind you may need to modify them some.
And they're not cheap at $570.00. I would suggest shortys, but anyone installing a C into a Fox is probably racing and they want long tubes anyway. So I highly doubt shortys are available.

Found this link too
http://www.ddautospec.com/products_headers.html#jump3

Found Headman 85620's that are also Fox with a 4bbl C motor.
 
#17 ·
Great work! Takes me back about a year and a half when I was installing my R&C suspension. What's the timeline on this project?
As far as headers, you need something matched up for a Fox body Mustang. Look for Cleveland to Fox conversion units. Everything about the R&C lines up with Fox accessories.
Here you go:
351CLEVELAND 4V FOX BODY SWAP HEADERS - HOLCOMB MOTORSPORTS INC

Now, I will warn you of one thing I have discovered. Even though the Fox parts fit the steering linkage, I'm attempting to use Fox shorties and H pipe ( on my 5.0) and things hang a little low so I'm going to have to cut and shorten the H pipe. So the headers might be a little low, so keep in mind you may need to modify them some.
And they're not cheap at $570.00. I would suggest shortys, but anyone installing a C into a Fox is probably racing and they want long tubes anyway. So I highly doubt shortys are available.

Found this link too
D&D Automotive Specialties - Fox Body Mustang Engine Swap Headers

Found Headman 85620's that are also Fox with a 4bbl C motor.
Great! I am looking into these now.

I am also looking into the Sanderson shorty headers. Any thought on these? The reviews seem very mixed. Not many complaints, however, seem to be about the quality of the product.
 
#18 ·
Put the fenders and hood back on the 'Stang. Poorly, mind you, but they are there and the neighborhood watch should be ok with it for a bit. Still waiting on headers. Really excited that it is looking like a car again.

Image
 
#19 ·
Well it has a been a bit since I have worked on the 'Stang. I picked up a VW Passat for a good price and have been rebuilding that for the last month. (please don't ban me!)

I am more then ready to get back to some American Muscle! Anyways, I have not started the car yet, and am waiting on a couple things. Here is the list:

1. I need to get my pulleys figured out. Nothing really lines up right now, and I need to somehow set it up so my water pump, alternator, and crank line up. I will try to post a pic later. Not going to worry about the power steering just yet.

2. Need to strip and paint the battery box. I have applied many coats of stripper to it, but it is stubborn. Sand blasting doesn't work too well either.

3. Need to hook up steering linkage. I am 90% sure my new Sanderson shorty headers will do the trick....fingers crossed. I do know I need to re route my linkage a bit...but nothing too terribly bad.

4. Valve covers interfere with my power brake booster. Need to get shorter ones, which is fine with my valves. The "tall" covers didn't serve a purpose with their height other then looking pretty.

5. Wiring. Should not be too bad, I just need to git'r done. I want my wiring to look pretty, so I will take my time with it.

6. Fire her up for the first time. Very nervous about this! Got a lot of money in that engine.

7. Exhaust system. Got a guy lined out to install one for $500 or so. His work looks good.

8. Paint....speaking of more money.

All in all....the list is a lot bigger then I would care to see. Time to get working on it. Just waiting on good weather at this point.

Alex
 
#20 ·
Hey guys,

Well I am doing more work on it now. The VW I was working on is complete and running well, so I can finally devote more attention to my baby.

I am trying to get ideas for my paint scheme, and could use some input.

First, this is a Gold Nugget special. That means something, and it would be too bad to change it. I have already molested this car quite a bit by changing from the 6 to the V8 and then the suspension. Not that I think anyone would "devalue" a car like this because of that, but at the same time, it seems wrong to ditch the vinyl top and gold.

Still, the stock Gold Nugget special look doesn't really do much for me. Here it is before I started working on it at a car show:

Image


To me, it kinda looks "grandma car." The new rims and stance will help a lot, but I would love the extra little push to make it look a little more worthy of a speeding ticket.

Here is one image I keep going back to:

Image


I think this scheme might work well with the vinyl top and gold.

Other then that I am out of ideas. Definitely open to suggestions.

Alex
 
#22 ·
Fast68- Not quite my cup of tea, but still a very beautiful car! The vinyl
tops are growing on me. Kinda reminds me of the 442 my dad has when I was a kid. I loved riding in that car.

Here is a [poorly] edited pic. It also includes a stripe down the side, which I have been leaning towards.

Image
 
#25 ·
Haha, everyone notices the girl.

I did order the sanderson headers. I installed them, and it looks like they will clear my steering column. Thank goodness! I will

Got my radiator in today. Mixed feelings on it. I was bit disappointed that there were nics and scratches on the front, new out of the box. Still, it doesn't look too bad, but you can bend the fins over just by touching them with your finger. You could write your name in it by barely pressing. Not sure if this is normal or not.

Image
 
#26 ·
Got some more work done today, finally.

The radiator came in, and I have zip tied it into place. I need to get bolts for it, but am out, and didn't have time to make it to the hardware store. At this point I am making a lot of progress, but it doesn't look like it, because it doesn't look too different.

Here is a shot of it up on jackstands with the new radiator blocking my engine. Don't know why, but this really makes it look more like a car. I like the look. Seeing nice shiny parts against the black engine bay really looks great.

Image


Image


Also worked on my steering linkage. The shaft clears the headers- barely. We will see how much the engine moves around when it is revved up. Hopefully not much. There is about 3/16" between the diameter of the shaft and the pipe.

Image


PMC came out and helped for a while. Would not sit still long enough to snap a non-blurry picture.

Image


Alex
 
#28 ·
Great work, keep the pics comming. Back in the 80's I had a 68 "j" code GT Coupe painted exactly like yours, nugget gold with the black hood stripes & side "c" stripe & black vinyl top. When I restored it I removed the vinyl top & painted it bright blue & had it custom pin striped.