Vintage Mustang Forums banner

OCHOHILL 65 fb build thread....

45K views 108 replies 31 participants last post by  2nd 66  
#1 ·
To start, I had been looking for a 65/6 fb to build for several months when I bought a 66 coupe. The coupe was disassembled when I bought it. I made a restomod of it. Literally, the week I registered the coupe for street use I found a 65 fb in Albequerque. The car was advertised for $5k and seller would not show it until that saturday at noon. This was a wednesday in mid december. I offered him $100 to show me the car first, his to keep whether I bought the car or not.
He agreed and I made the purchase.
The story on the car goes like this:
-C code car
-Same owner since 69-it came with the 69 New Jersey title
-the owner was a drag race guy
-In 1975 was towed out to Albequerque with a U-haul truck using a single axle dolly
-the car blew the left rear tire on the trip and took out the quarter panel
-the car was partially disassembled for paint and some panel replacement and parked ever since

That's how I found the car. I did not take any pictures of it. Suffice it say it was 6 different colors not including the shades of rust.

The good:
It was 5k
all the interior was there
glass is good
close ratio toploader
289 engine with a claimed 300hp and hi po heads
vintage cast iron scattershield
new stock rad
new mallory billet dual point dist

the bad:
needs floor pan halves
left quarter
trunk floors, rad support, front right apron and taillight panel marginal but getting replaced
dent in left front subframe where it angles up
dents in rocker panel
fenders will need work or replacement
8" rear end cracked and teeth missing from ring gear

the goofy:
coil spring shocks all the way around
leaf spring shackles a foot long (I think he was going for the gasser look)

I took the car apart in January. Initially, I was going to sell the coupe to finance this but my wife laid claim to the coupe. So, I am progressing as money allows.

So far, I have completed the following:

-media blast the areas under the car to repair
-pulled out dent in front subframe
-pulled out dents in rocker
-replaced rad support and right front apron
-welded up a bunch of the sheet metal and engine compartment
-found/bought the brakes and wheels (cobra brakes and boss 338 wheels)
-T5z waiting patiently
-9" rear with traction device and 3.89's
-driver side floor replaced
-driver side subframe connected

Pictures to follow.

Yes, I know I should have taken pictures of it on the trailer. But, my wife gave me so much caca after I brought it home. She would have mocked me more if I busted out the camera. Even my kids were getting in on the ribbing.
 
#91 ·
Long time no post.

I hit a snag with the suspension. The company with the race car inspired name that I was planning on using doesn't seem to be up to the task. I pestered them for a while about shock specs and a custom shock form to fill only to find out they didn't have one. They suggested I call Maier Racing and speak to Mike. In the between time I contacted several custom shock builders. Some wanted a minimum order of shocks, like 32, others told me flat out this was their busy season and to try back when the race season was over.

I was able to get Mike Maier on the phone. He was kind enough to speak with me for several minutes. I described the system I was building and the problem with the 'race shock' company. He commented he was currently designing his own system very similar to mine. He was kind enought to offer some geometry changes to make it 'nearly identical' to his current prototype. He said if I waited long enough, his finished shock should fit my system.

He also mentioned he did some shock R and D for a well known suspension supplier in this forum. I was glad to hear that for the forum and the vendor. A suspension that was R and D'd on an actual mustang. Who would have thunk it?

So, on to the changes. I wasn't real fond of the quality of the work on my crossmember. I made another one that I am happier with. I made some changes to allow for some suspension adjustments.

The LCA inner mount is adjustable. The top hole is stock. It is boxed out to completely hog out the metal and allow for fine adjustment if necessary. Otherwise, they are 3/4" apart.

Image


Image


My phone with a flash leaves a little to be desired in the quality.
 
#92 ·
I know it will be some time before a shock is available even if I don't use Mr. Maier's shock so I started another portion of the build.

It has been 2 months or so since my conversation with Mr. Maier. In the meantime, I looked over his company products to see if there was something I could use. It only seems right for his advice. I was looking for a heat extractor hood when I found this...

Image


So, I emailed the website asking for dimensions on the cowl portion to help me with a situation I'll explain in a bit. Then I waited, and waited.

2 weeks later I send another email, and wait...

Shame on me, they may not be computer oriented. So I call. I get transferred to a guy who worked in the shop. I think jackpot. He says I want to talk to another guy who isn't available. He takes my contact info and says so and so will call back. And I wait...

It has been another several weeks. This only adds to my further frustration with the suspension. I was about ready to take up motocross again when my wife pointed out my mx pants don't fit anymore. Damn.


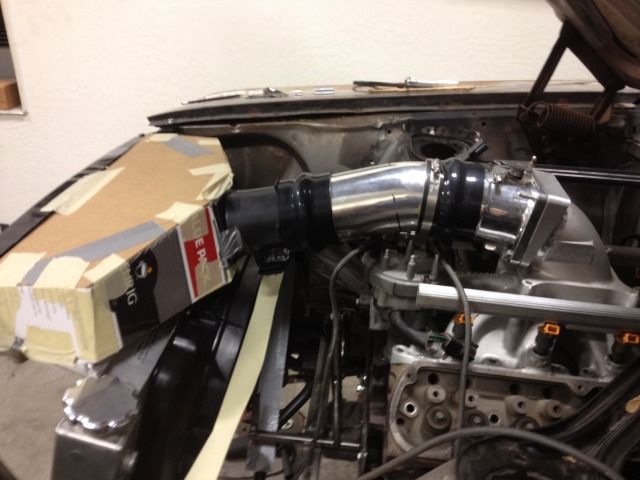
In the meantime, I have been screwing around with a Victor Jr intake converted to EFI with the elbow coming out the front making an over the radiator cold air intake or otrcai. It's real acronym, google it.

I have only seen photos of 2 other mustangs done like this. They were both fox bodies.

It isn't cheap. I had to buy a $230 elbow and cut it. Wilson makes it a 100* when I needed 80* to clear the distributor. I cut and mated the elbow but paid someone to weld it.


mock up piece to get angle
Image


getting the angle close
Image


finished piece, not sure why it is sideways
Image
 
#93 ·
Mocking things up

Image


Image


Image


The intake takes two flat panel filters. The filters are from a full size chevy truck. Amsoil makes a performance filter in this size. I can get this filter in any auto parts store in the country. Each filter is rated to flow 320 cfm.

I forgot to explain why I went this route. Well, I changed my mind to fuel injection a while back and went so far as to get a hold of a couple good intakes. They didn't fit well. I didn't like them.

If you take a intake valve in a head that flows 300 cfm and bolt an intake on it that flows geater than 300 cfm it nets less than 300 cfm. Every time you extend the length of the intake or a bend in the tract it will diminish the potential flow of the intake. I chose this route to minimize the loss and to get some cooler air in there on those hot AZ summer days.

The box will work me over good. I can't weld aluminum well at all. Even tacking it is a bear.

Lastly, I need hood info to find out if this stuff will all clear. Right now, I can place a GT350 scoop 6" from the rear of the hood and it may be very close (2" is oem).

So I may start a hood thread and try to link up all fiberglass hood dimensions available. It will require some effort on the forum members to get good data. I couldn't find diddley.
 
#95 ·
Ochohill, I ran a cowl 3" hood on a '86 TBird and got some weird results. At speeds around 60 MPH, it would produce what looked like a mini tornado over the engine. I was able to look in the hood opening and see all this debris swirling around. I lived in the Ca desert just north of LA, and there was a lot of dust in the air. I don't know if this would hurt anything but it sure wouldn't benefit air flow if I were using it for induction into the engine. I think the reason it was doing this is the air flowing into the engine compartment from the front, hit the air flowing in from the rear of the hood and caused the turbulence. Another thing is after the cowl hood install, I had a serious amount of trash and grit on the top of the engine, it looked like I had been off roading or something.
 
#96 ·
Thanks for the cowl hood info. It confirms some things I read about them elsewhere. My plan is to close up the cowl opening. I want air moving front to rear out the extractor, not in from the back.

FYI the base of the windshield is a high pressure are. That is what pushes air into the cab.
 
#101 ·
Good news! I don't think I will have to use an aftermarket hood.

Image


Image


Image


I would prefer the plain old stock hood over any other. I hope a GT350 hood scoop will do.
The other option besides the GT350 scoop would be one off of a 78 MustangII CobraII.
 
#99 ·
fwiw. That hood looks identical to the fox late 80s saleen/steeda extractor hood, they had 2" cowls. Looks like your ok with your current hood though.

Damn shame to cut up a wilson elbow, but turned out great. You beat me by a few hours to that intake on corral ;) im in the process of bunging my spare vic jr, keep us posted on the progress
 
#100 ·
Ocho,

I am down in Tucson and I noticed that you may need your aluminum intake box welded. I have been TIG welding aluminum whenever I can, and love the practice. I would be glad to lend you a hand, for the cost of gas and rods, I'd be happy to help.

Here is a sample of my aluminum welding.

JohnPro-Official StangFix Fender Roller Tool Box update

PM me if you are interested for contact info. Thanks
 
#104 ·
That intake system is going to slow you down. Its patterned too similar to a Camaro or Vette :D

Nice work and documentation. Any feedback from MM yet?
 
#105 ·
Dude I love your build, every part of it. I try real hard in my life not to be critical of what other people do, so please forgive my comment. Of all the cool *** **** you are doing, the only thing that bothers me is your positive battery cable that is with out a grommet of any kind as it passes though your new fancy frame rails. Ok that's it I got it off my chest. If I knew you I would buy you a shot at your local watering hole and pick your brain. Great job man!
 
#106 ·
My apologies. I thought I had created a post explaining what happened. I obligated myself to help build a 67 fastback and parked this car in a corner last summer. I have been knee deep in 67 sheetmetal. Fate stepped in and I ended up buying the 67 plus a parts car. It's a real rustbucket that needed a floor, rockers, firewall and dash. I have been replacing those parts and hope to have it at the blasters before it gets real hot.

I had to slow down a bit last fall because my son was a senior and it was his last year to wrestle. That took up a lot of time from December to February. I will be at least a year before I can get back on this car.

I tried calling MM a couple of times but never followed through because I wasn't working on that car. I keep watch here regularly and find it a bit interesting that nobody has bought the kit yet.

Joesfly it isn't painted yet. If not a grommet it will get another layer of casing.

I had tacked together that aluminum box for the intake. I learned that I did not have a clue how to weld aluminum. When I get back to it, I may have to have someone else weld that.

I am still here. The car isn't going anywhere. I have to finish this other car first. It's mostly stock type stuff so it shouldn't take as long.
 
#108 ·
I'm here infrequently. This car is in the same state. Life and another project have got in the way.

If it's any consolation, I should be back on this one in a couple of years.
Any question I can help with?

D