Hello Everybody, this write-up will be detailing my experience performing the ever popular t5 swap. This write up strictly pertains to the conversion of a 1969 Mustang 302 coupe with the C4 automatic to a t5 world class transmission utilizing a stock z-bar linkage and having its original engine. As we all know, many things are shared between all 60’s mustangs, but many changes also occurred and as I am no Mustang historian, I can not attest to the methods employed here working on other model years. I will hypothesize, however, that for 69-70 mustangs, this swap should perform the same.
When I became interested in performing this swap I conducted hours upon hours of study on the subject. While there are other write-ups out there, there was much left to be desired. For one, many of the conversions end up using a cable clutch system or hydraulic, I REALLY wanted to maintain a factory appearance so my endeavor would focus on adapting the mechanical z-bar linkage. I could not find, easily, answers to key points of the swap such as “Where do I drill the hole in the fire wall for the clutch rod?” or even “What size hole is required in the firewall?” which are the exact kinds of questions I will be covering so that others may have easy access to them. I will do my best in explaining how I achieved various aspects of the swap, what parts I chose, and my reasoning for choosing them. If anything is left out, please feel free to ask about it by replying to the thread so that I can answer and others can also benefit. Without further ado, lets dive in.
MATERIALS/PARTS:
I started this swap with a factory c4 automatic car, which means there was lots to be obtained. I will try to recall all the parts I used in this build as well as costs at the time of build. This section is an exhaustive wall of text, but very informative as to what parts we need, why we need them, what they cost, and where I got them.
T5-Trans: I bought my t5 transmission from a you-pull it yard. I pulled it out of a 1998 v6 mustang. The v6 t-5 trans are rated pretty much the same as the 80’s 5.0 units, and they can be made to work well. Please avoid, if possible, non-world class t5’s, 4-cylinder t5’s, and t5’s out of 1999+ v6 mustangs. Why? The simple answer is less work! The non-world class t5’s from 5.0’s will work, but lack some of the benefits the world class trans use, such as bearings instead of bushings. The 4cyl ones are a bit of an oddball with output shaft sizing and gearing, and the 99+ t5’s do not use a mechanical speedo gear drive! My 98 trans uses an electronic signal converter but still employs a driven and drive speedo gear. In 1999 they went to a hall effect sensor and so the output shaft and tail housing have no means for utilizing driven and drive speedo gears. I bought my t5 for a whopping $150. It works perfectly.
Clutch Pedal: Going from auto to manual, obviously you need a clutch pedal. Luckily, Modern Driveline sells a clutch pedal that will (for the most part) work in the factory pedal assembly. I say for the most, not because of an issue with their pedal but my factory brake pedal, more on that later. The pedal can be purchased from modern driveline for $160 Part #MD-402-6970M-C. Cheap compared to used mustang assembly. And I can vouch for the fact that it WILL work in your automatic pedal assembly.
Clutch pedal pad: You will see a majority of my components come from modern driveline, they do specialize in these conversions. MD has the pad for the clutch, part #MD-411-1076 for $5.95. If your assemblies have chrome trim, you can also purchase that from them as well. Mine don’t so I didn’t.
Roller bearing kit for pedals: This is an amazing upgrade. The original assemblies use some sort of aluminum load bearing surface with plastic nylon bushings that the brake pedal pin pivots on. These can wear severely and also produce a good amount of drag. For only $35 you can purchase the roller bearing upgrade kit. Please do it. You won’t be sorry. Modern Driveline Part # MD-411-1081
Clutch pedal rubber stop: This can be something easily overlooked. This little rubber stop mounts onto the pedal hanger assembly and acts as a bump stop for the clutch pedal. I’m glad I had the foresight to look at the original ford clutch assembly and look for this part. Without it, when releasing the clutch pedal, the pedal will hit metal and make loud clanks. Since manual and auto cars used the same pedal hanger bracket, they all have the provision for this bump stop. All I had to do was push it into place. $1.95 Modern Driveline Part # MD-402-1003
Cross Member: This piece makes the swap a breeze. You will need a new cross member for the T-5. Some people modify the stock one, others fabricate their own. If you have the means, go for it. I have the means but didn’t care to, so for $150, I purchased one from modern driveline. Piece of cake. Modern Driveline Part # MD-6773M-CMT5
T5 Reverse Switch Harness: In this write-up I will show how to utilize the t5 reverse harness switch to make your reverse lights work. Since I bought the transmission last, I bought many items ahead that I may have not needed. My trans I pulled came with the wiring which I could have spliced, but as I didn’t know where my trans was going to come from, I elected to buy the harness. $19.50 from Modern Driveline Part Number MD-700-0001.
Hurst Shift Lever: For this build I elected to go with a Hurst shift lever. This one’s description seemed to fit the bill perfectly and I will attest to the fact that its positioning in the car is beyond perfect. Super comfortable positioning from sitting position. A little pricey at $92.95 but WELL WORTH IT! Modern Driveline Part #MD-320-2040
Shifter Boot: Modern Driveline carries the oem style Hurst shifter boots. PERFECT! Only $24.95. Modern Driveline Part # MD-321-1062-H
Shifter Ball: I elected to go with a classic white Hurst shifter ball. Modern driveline sells Hurst shifter balls in 5-speed pattern. I wanted a 4-speed pattern to have a more “period correct” look. I found my Hurst 4-speed shifter ball on ebay for $24.88.
Shift Boot Trim Bezel: You can buy these new, I bought mine used on ebay for $10.99.
Hurst Lever on T5 Shifter Bolts: These bolts have a special shoulder so mounting the Hurst shifter to the t5 shifter produces a nice attachment point devoid of free play. Only $8.00 Modern Driveline Part #MD-201-2012
Fulcrum Adapter Kit: This kit is key for being able to utilize the oem style z-bar clutch linkage assembly. Fox body mustang bell housings use a cable which pull the clutch release arm toward the engine. The z-bar needs to push the clutch release arm away from the engine. This clever device lets us convert the fox bellhousing to accomplish just that. $43 Modern Driveline Part #MD-401-2001-67
Flywheel Bolt Kit: I didn’t know if the flex plate bolts from the automatic set up would work with a flywheel, and I never checked. I just purchased these new bolts and they worked grand. $17 Modern Driveline Part # MD-403-1001
Flywheel: So, my 302 is mildly built. This car is a cruiser for me and won’t get thrashed. As such, I decided to just use a stock 1969 spec flywheel. I purchased mine New made by Luk from rock auto for $65. Now, my 302 is the original numbers matching block, which requires a 28 oz imbalance. This flywheel is just that, 157 tooth 28oz imbalance. If you are looking for more power or have a H.O block, you may need to research a different clutch set up. Aftermarket flywheels were looking to run upwards of $200 and I wasn’t interested. I did read, however, that some ford f150’s non-H.O blocks used a larger clutch and those flywheels can be used here. That would be up to you to verify and research. OEM 1969 Luk flywheel $65 Rock Auto Part # LFW451
Clutch Kit: I like Luk, used them plenty in other cars and they are the OEM manufacturer for many automakers. Being that this car wouldn’t be thrashed, I went for a stock style replacement clutch kit, a 10” clutch. However, I DID go with a diaphragm style clutch instead of the long lever style. The diaphragm clutch gives a lighter pedal and doesn’t require that heavy pedal assist spring ford originally had in the pedal assembly. I went with a Luk RepSet. So far I’ve been pleased. You may choose whatever clutch set up you think will work for your needs, this one fit my budget and build and even came with an assortment of pilot bearings and bushings. For those that don’t know, the original mustang 4spd and t5 share the same input shaft spline count and thus these clutches work with the t5. Luk RepSet $72.79 Rock Auto Part # 07014
Pressure Plate Bolts: Modern 5.0 H.O cutch systems use dowel pins to locate the pressure plate. It wasn’t until many hours of research I learned that the oem clutch system for a 69 mustang does NOT. Instead they use special bolts with shoulders to locate the pressure plate. I bought mine for $17 from Modern Driveline. If you do not use these bolts, and instead use regular bolts, your pressure plate could be off center causing vibrations and wear. Modern Driveline Part #MD-403-2004
Engine Block Plate: I’ve read, with modification, you can use the auto trans block plate. I’m lazy, so I bought one specially made by Modern Driveline. $35 Modern Driveline Part #MD-401-1106-A
Bellhousing: The fox bellhousing is what you want to use. Maybe if you are able to pull your trans from a fox you don’t have to buy this separate. The junkyards didn’t have any and used ones on ebay were just about as much as a new one. So I elected to purchase a new one rather than deal with cleaning an old grimy one. Maybe you are lucky and have a line on a cheap one. Me, I bit the bullet. $225 Modern Driveline Part #MD-401-1101.
Transmission to Bellhousing Bolt Kit: Again, since I purchased the transmission dead last, I didn’t know what it would come with. I purchased the bolts that go from trans to bellhousing ahead of time. If you pull the trans from a junkyard save them. $13.50 Modern Driveline Part #MD-201-2013
Trans to crossmember mount: Believe it or not, the C4 and t5 use the same trans mount. Since I had previously replaced the trans mount on my c4, I just removed it from the c4 and bolted it up to the t5. It was around $6 from rock auto. Do save the t5 trans mount bolts though!
Speedometer Driven gears: Chances are you will need to change your speedo gear to work with the t5. I went on ebay and purchased a 4 speedo driven gear set to play with so I could calibrate my speedo. They will fit the stock speedo cable perfectly. I bought my set on ebay ford genuine, for $19. You will see them around for about $10 a piece.
7 Tooth Speedo Drive Gear: pre sn95 mustangs (so fox era) utilized a 7tooth speedo drive gear in their transmissions. Sn95 era (94-98) use an 8 tooth. Trying to dial in a gear ratio other than stock on an 8 tooth is nigh impossible. I’ll cover this more later, but do yourself a favor and purchase a 7tooth or 6t speedo drive gear. Lets get this done upfront, so later when you decide to change from your stock 3.00 rear gears to 3.55 you don’t also have to drop the trans and deal with this then. I bought mine ford genuine on ebay for $19
9-1/4 Input shaft kit for pre sn95 mustangs: So, this is only required if you pull your trans out of a 94-98 5.0 mustang or v6 mustang. Because the sn95 was physically longer, ford lengthened the input shaft and bellhousings on those cars to move the shifter back. For our 69, we don’t want that. So, if your t5 came out of one of these, purchase this kit. My kit was sourced from ebay for $112.75 and came with the input shaft, steel bearing retainer, new bearings, shims, and seal. Now, you may be thinking “ WHAT! I can’t change that! That sounds terribly complicated!” It’s not, I’ll walk you through it. It’s easy and worth it considering the v6 t5’s are much more plentiful (spelled cheaper) than 5.0 t5’s.
T5 output shaft seal: While we’ve got that trans on a bench, lets replace that output shaft seal! The factory seal has a dust lip on it that many of the replacements offered don’t. This lip greatly lengthens the life of the seal but is hard to source. I eventually got the part number from TIMKEN, 710426, you’re welcome. Source this from your favorite supplier. I think I found mine on Amazon for $12.
1 5/8 Hole Saw: Hole saw? What for? Well, we need to drill a hole in the firewall for our clutch linkage rod. Not able to find this info online, I measured the clutch rod boot that snaps into this hole and arrived at this number. I later did find a post on some forum where a member measured their factory 4spd car hole and confirmed this is a ford sized hole. I bought my hole saw off amazon as no hardware store, including the home depot, carried this size. $16.15 LENOX brand Part # 1772931
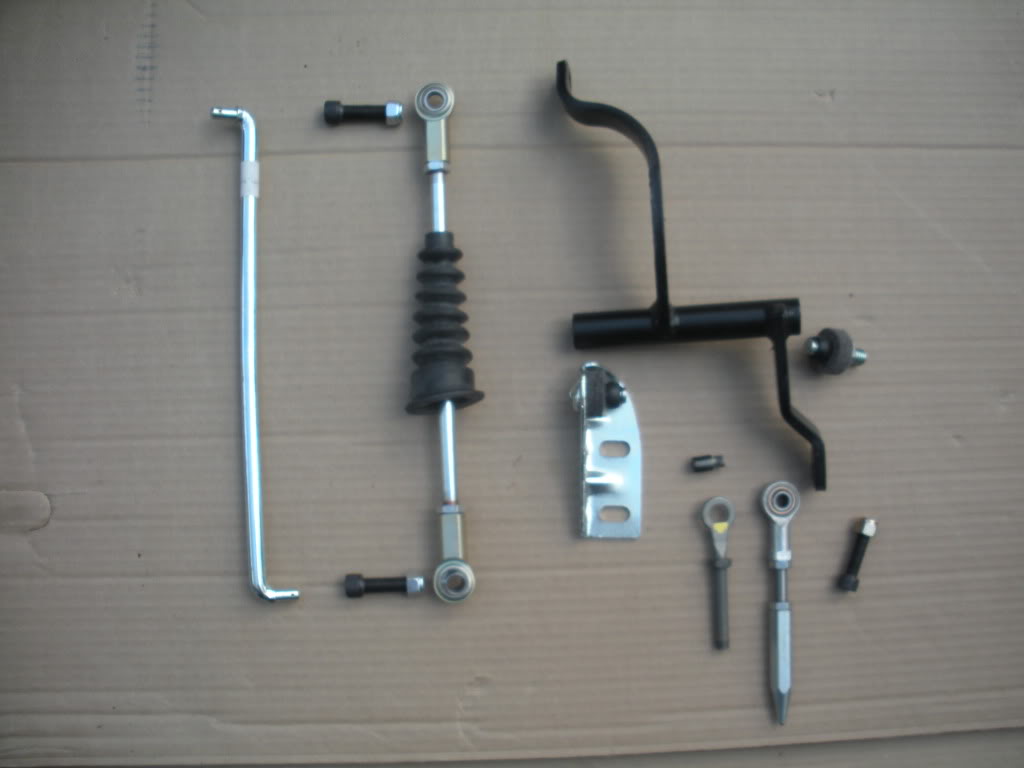
Clutch Linkage Kit: So, I purchased this kit from C.J Pony and I gotta admit I wasn’t very pleased. They pieced together the kit and would send them to me once they received them which was messy. First off, I later read that the equalizer bar they supply is a crappy repro that doesn’t fit stock applications well. Not wanting to be hung up by a crappy z-bar I orderd a scott Drake repro. More on this later. Then my lower clutch rod was missing its lock nuts, and the kit was missing cotter pins and such. I’d suggest piecing it together yourself from somewhere like NPD link. But here’s what we need and I’ll give the c.j pony numbers for what I got through them and costs:
65-70 v8 & 6cyl Frame Bracket: This will be a pivot point for our z-bar. $18.47 CJ # CEBBF1
67-70 equalizer bar: the one I used was purchased from NPD LINK, which is a site I learned about after purchasing the cj kit. This is a scott drake unit. Highly recommend. 7528-2A $68.75
Lower Clutch release lever spring: I ended up going to a hardware store and buying a stiffer version because this one was too weak. $15 CJ pony # C9ZZ7591A
Upper clutch release spring: $13.85 CJ Pony # C9ZZ7523A works perfect.
Clutch Rod Boot: This is the boot that goes on the firewall. $10.16 CJ Pony # C6OZ7A533C
Clutch Release Lever Boot: This is the original boot for a 4spd. We will adapt it for our 5speed. Get it. $17.55 CJ Pony # C6OZ7513C.
Lower clutch rod Adjustable: $18.99 CJ Pony #CRL6
Scott drake Equalizer bar Bushing/Bracket Kit: This has the bushings as well as engine side bracket. $20.31 CJ Pony C5ZZ-7A531-K.
Upper clutch rod: Goes between pedal and equalizer bar $16.99 CJ PONY # CRU3
Clutch rod bushings: Sold as a pair but I later learned you need 3. So buy two pair. $5.99 each CJ Pony # HW1260
1969 ford mustang clutch fork release lever: We need this guy, Its just a replacement release lever for a 69 4spd mustang. I bought mine for $41.35 off eBay.
ATF fluid: 3 quarts, $15 at Walmart. Dexron III.
Bellhousing to motor bolts: The fox bellhousing is slightly different, and we need longer bolts. I went to the hardware store and purchased 4 2” long 7/16-14 grade 8 flanged bolts for the four side mounting points and 2 1.5” 7/16-14 grade 8 flanged bolts for the top two mounting points below the intake manifold. the 2” will bottom out there before securing the trans. $12
I’m sure I’m forgetting a few odds and ends, but I have about $1650 in my swap.
DISSASEMBLY:
Removing The Auto: The first step is to get that old tranny out of there. I highly recommend investing in ford shop manuals for your 69. Best investment I’ve made. Follow the instructions in your ford manual for tranny removal. A very brief recap of the removal process goes like this:
• Drop pan, drain fluid, put pan back in place.
• Remove dust shield cover for torque converter. Using a wrench on the crankshaft, turn the motor to reveal the torque converter bolts and remove.
• Remove driveshaft.
• Remove shift linkage assembly. You can go ahead and pull the shifter out of the car, we don’t need it anymore. Save the bolts though! We’ll use those for the shift boot.
• Undo the neutral safety switch and reverse light wires from the plug at the fire wall.
• Undo your trans cooler lines running to the radiator. You can remove them completely from the car, we don’t need those anymore.
• Undo the speedo cable from the trans, but leave the speedo cable in the car, its usable on the t5.
• Loosen your e-brake cable and hang it out of the way
• Remove your exhaust system to have more room.
• Remove your starter. Disconnect the battery first though.
• Support your trans with a trans jack and remove the bolts holding the cross member in place
• Lower the trans and separate it from the motor. This can be tough. I had to use a chisel to wedge between the bellhousing and block. Be careful not to score the block. Also be careful of the
torque converter as it can plop out and onto your foot when moving the trans. It’s not light and it hurts. Ask me how I know.
• Remove the flex plate and engine block plate.

Here the trans has been successfully removed from the car

The car is now ready to begin the T5 conversion.
Converting The Pedal Assembly to Manual: Unfortunately it wasn’t really until after my pedal assembly conversion was pretty much completed I had the thought that I should document this conversion for others, so bear with me. You need to remove the pedal assembly to facilitate this change, it makes it so much easier. The ford manual is useful for this but I will summarize the steps for getting the pedal assembly out of the car:
• Remove dashboard from vehicle. Follow ford instructions for removal
• Remove gage cluster from vehicle
• Remove lower steering column knee cover
• Unbolt rag joint from steering box
• Unbolt the steering column bracket at the firewall
• Unplug steering column wiring harness
• Remove steering column
• Undo master cylinder and other bolts through firewall that attach to pedal assembly hanger bracket
• Unplug brake light switch from brake pedal
• Undo remaining bolts and drop pedal assembly out of car
With the pedal assembly out of the car you can now do the roller bearing conversion
This is the clutch pedal offered from Modern Driveline

It is a beautiful piece that went together well. It comes with the pivot rod you’ll need. This is the Scott Drake roller bearing conversion kit I purchased. Do yourself a favor and grab this kit. It’s worth it. It has excellent instructions that are easy to follow.

While the pedal assembly is out, now is a good time to install that clutch pedal bump stop. Actually, looking at the modern driveline photo it looks like the clutch pedal they make has a provision for the bumper to be attached to the pedal. I attached mine to the pedal hanger bracket. Either is fine.
The issue I ran into is this: Apparently Ford made several different brake pedals. There’s a different brake pedal for an automatic car with power brakes, automatic car with manual brakes (which I have), Manual car with power brakes, and manual car with manual brakes. I was cheap and didn’t want to spend the money on a new pedal. Maybe I could have bent my pedal but I opted to cut it. Here’s what that looks like

Without the clearance the pedals would touch. That’s a no-no. In the end it looks fine, I decided for budget I wouldn’t be too picky about that. Here’s what they look like installed in the car and trimmed

Re-install the pedal assembly
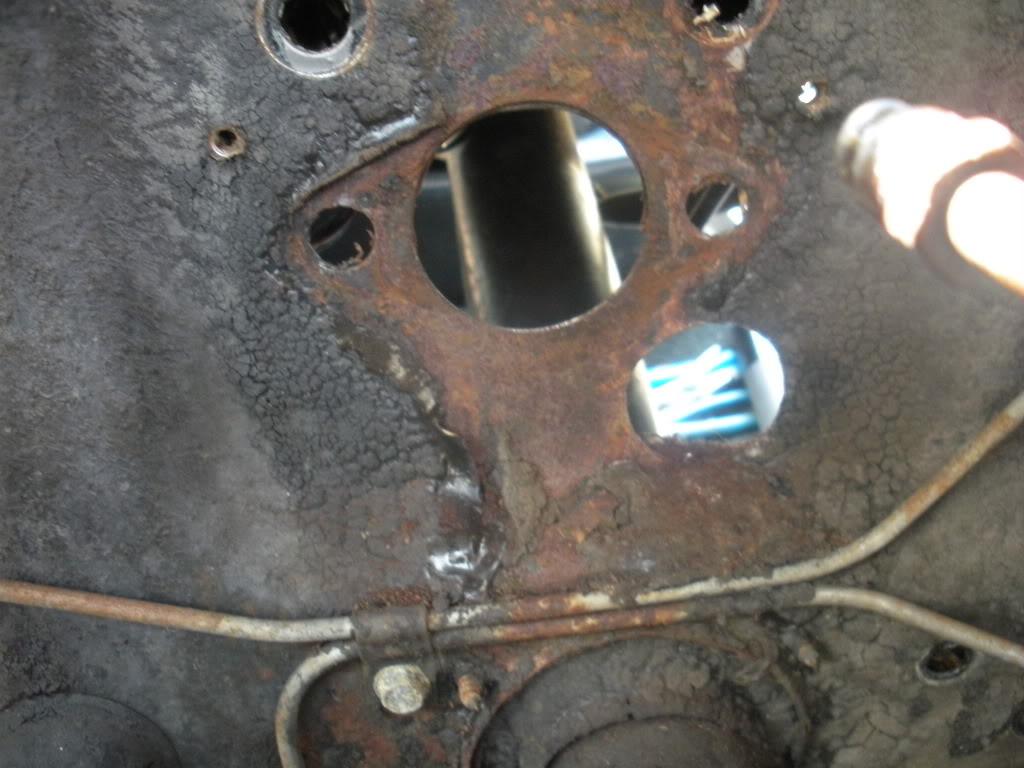
Adding the Clutch Pedal Rod Hole:
Since we are hoping to use the factory style linkage in our build, we need to add that hole in the firewall for the rod to pass through. But where does that darn hole go? After extensive research and staring at the assembly in the car I figured it out. All of fords firewalls are stamped with a dimple where the center of the upper pedal rod hole goes, perhaps as a guide for those on the assembly line. Here is a picture of that dimple drilled. I should have snagged a photo before drilling it but it was about at this point I decided I should document all this. If you look in this area of your 69, It’ll be there.

I’d highly suggest drilling this while the pedal assembly is out of the car, Since my engine was also out of the car, I drilled it from the engine bay. This is where we need to use that handy hole saw we bought, the 1 5/8” one. Here’s a picture,

With that chucked in a drill, we can make our firewall look like this
Kinda scary adding a gaping hole, but it’s essentially to factory spec. Here we see our pedal rod poking through

And finally with the dust boot in place, covering that gaping hole;

This picture was taken much later with the z-bar installed so take it as a foreshadowing of our success.
When I became interested in performing this swap I conducted hours upon hours of study on the subject. While there are other write-ups out there, there was much left to be desired. For one, many of the conversions end up using a cable clutch system or hydraulic, I REALLY wanted to maintain a factory appearance so my endeavor would focus on adapting the mechanical z-bar linkage. I could not find, easily, answers to key points of the swap such as “Where do I drill the hole in the fire wall for the clutch rod?” or even “What size hole is required in the firewall?” which are the exact kinds of questions I will be covering so that others may have easy access to them. I will do my best in explaining how I achieved various aspects of the swap, what parts I chose, and my reasoning for choosing them. If anything is left out, please feel free to ask about it by replying to the thread so that I can answer and others can also benefit. Without further ado, lets dive in.
MATERIALS/PARTS:
I started this swap with a factory c4 automatic car, which means there was lots to be obtained. I will try to recall all the parts I used in this build as well as costs at the time of build. This section is an exhaustive wall of text, but very informative as to what parts we need, why we need them, what they cost, and where I got them.
T5-Trans: I bought my t5 transmission from a you-pull it yard. I pulled it out of a 1998 v6 mustang. The v6 t-5 trans are rated pretty much the same as the 80’s 5.0 units, and they can be made to work well. Please avoid, if possible, non-world class t5’s, 4-cylinder t5’s, and t5’s out of 1999+ v6 mustangs. Why? The simple answer is less work! The non-world class t5’s from 5.0’s will work, but lack some of the benefits the world class trans use, such as bearings instead of bushings. The 4cyl ones are a bit of an oddball with output shaft sizing and gearing, and the 99+ t5’s do not use a mechanical speedo gear drive! My 98 trans uses an electronic signal converter but still employs a driven and drive speedo gear. In 1999 they went to a hall effect sensor and so the output shaft and tail housing have no means for utilizing driven and drive speedo gears. I bought my t5 for a whopping $150. It works perfectly.
Clutch Pedal: Going from auto to manual, obviously you need a clutch pedal. Luckily, Modern Driveline sells a clutch pedal that will (for the most part) work in the factory pedal assembly. I say for the most, not because of an issue with their pedal but my factory brake pedal, more on that later. The pedal can be purchased from modern driveline for $160 Part #MD-402-6970M-C. Cheap compared to used mustang assembly. And I can vouch for the fact that it WILL work in your automatic pedal assembly.
Clutch pedal pad: You will see a majority of my components come from modern driveline, they do specialize in these conversions. MD has the pad for the clutch, part #MD-411-1076 for $5.95. If your assemblies have chrome trim, you can also purchase that from them as well. Mine don’t so I didn’t.
Roller bearing kit for pedals: This is an amazing upgrade. The original assemblies use some sort of aluminum load bearing surface with plastic nylon bushings that the brake pedal pin pivots on. These can wear severely and also produce a good amount of drag. For only $35 you can purchase the roller bearing upgrade kit. Please do it. You won’t be sorry. Modern Driveline Part # MD-411-1081
Clutch pedal rubber stop: This can be something easily overlooked. This little rubber stop mounts onto the pedal hanger assembly and acts as a bump stop for the clutch pedal. I’m glad I had the foresight to look at the original ford clutch assembly and look for this part. Without it, when releasing the clutch pedal, the pedal will hit metal and make loud clanks. Since manual and auto cars used the same pedal hanger bracket, they all have the provision for this bump stop. All I had to do was push it into place. $1.95 Modern Driveline Part # MD-402-1003
Cross Member: This piece makes the swap a breeze. You will need a new cross member for the T-5. Some people modify the stock one, others fabricate their own. If you have the means, go for it. I have the means but didn’t care to, so for $150, I purchased one from modern driveline. Piece of cake. Modern Driveline Part # MD-6773M-CMT5
T5 Reverse Switch Harness: In this write-up I will show how to utilize the t5 reverse harness switch to make your reverse lights work. Since I bought the transmission last, I bought many items ahead that I may have not needed. My trans I pulled came with the wiring which I could have spliced, but as I didn’t know where my trans was going to come from, I elected to buy the harness. $19.50 from Modern Driveline Part Number MD-700-0001.
Hurst Shift Lever: For this build I elected to go with a Hurst shift lever. This one’s description seemed to fit the bill perfectly and I will attest to the fact that its positioning in the car is beyond perfect. Super comfortable positioning from sitting position. A little pricey at $92.95 but WELL WORTH IT! Modern Driveline Part #MD-320-2040
Shifter Boot: Modern Driveline carries the oem style Hurst shifter boots. PERFECT! Only $24.95. Modern Driveline Part # MD-321-1062-H
Shifter Ball: I elected to go with a classic white Hurst shifter ball. Modern driveline sells Hurst shifter balls in 5-speed pattern. I wanted a 4-speed pattern to have a more “period correct” look. I found my Hurst 4-speed shifter ball on ebay for $24.88.
Shift Boot Trim Bezel: You can buy these new, I bought mine used on ebay for $10.99.
Hurst Lever on T5 Shifter Bolts: These bolts have a special shoulder so mounting the Hurst shifter to the t5 shifter produces a nice attachment point devoid of free play. Only $8.00 Modern Driveline Part #MD-201-2012
Fulcrum Adapter Kit: This kit is key for being able to utilize the oem style z-bar clutch linkage assembly. Fox body mustang bell housings use a cable which pull the clutch release arm toward the engine. The z-bar needs to push the clutch release arm away from the engine. This clever device lets us convert the fox bellhousing to accomplish just that. $43 Modern Driveline Part #MD-401-2001-67
Flywheel Bolt Kit: I didn’t know if the flex plate bolts from the automatic set up would work with a flywheel, and I never checked. I just purchased these new bolts and they worked grand. $17 Modern Driveline Part # MD-403-1001
Flywheel: So, my 302 is mildly built. This car is a cruiser for me and won’t get thrashed. As such, I decided to just use a stock 1969 spec flywheel. I purchased mine New made by Luk from rock auto for $65. Now, my 302 is the original numbers matching block, which requires a 28 oz imbalance. This flywheel is just that, 157 tooth 28oz imbalance. If you are looking for more power or have a H.O block, you may need to research a different clutch set up. Aftermarket flywheels were looking to run upwards of $200 and I wasn’t interested. I did read, however, that some ford f150’s non-H.O blocks used a larger clutch and those flywheels can be used here. That would be up to you to verify and research. OEM 1969 Luk flywheel $65 Rock Auto Part # LFW451
Clutch Kit: I like Luk, used them plenty in other cars and they are the OEM manufacturer for many automakers. Being that this car wouldn’t be thrashed, I went for a stock style replacement clutch kit, a 10” clutch. However, I DID go with a diaphragm style clutch instead of the long lever style. The diaphragm clutch gives a lighter pedal and doesn’t require that heavy pedal assist spring ford originally had in the pedal assembly. I went with a Luk RepSet. So far I’ve been pleased. You may choose whatever clutch set up you think will work for your needs, this one fit my budget and build and even came with an assortment of pilot bearings and bushings. For those that don’t know, the original mustang 4spd and t5 share the same input shaft spline count and thus these clutches work with the t5. Luk RepSet $72.79 Rock Auto Part # 07014
Pressure Plate Bolts: Modern 5.0 H.O cutch systems use dowel pins to locate the pressure plate. It wasn’t until many hours of research I learned that the oem clutch system for a 69 mustang does NOT. Instead they use special bolts with shoulders to locate the pressure plate. I bought mine for $17 from Modern Driveline. If you do not use these bolts, and instead use regular bolts, your pressure plate could be off center causing vibrations and wear. Modern Driveline Part #MD-403-2004
Engine Block Plate: I’ve read, with modification, you can use the auto trans block plate. I’m lazy, so I bought one specially made by Modern Driveline. $35 Modern Driveline Part #MD-401-1106-A
Bellhousing: The fox bellhousing is what you want to use. Maybe if you are able to pull your trans from a fox you don’t have to buy this separate. The junkyards didn’t have any and used ones on ebay were just about as much as a new one. So I elected to purchase a new one rather than deal with cleaning an old grimy one. Maybe you are lucky and have a line on a cheap one. Me, I bit the bullet. $225 Modern Driveline Part #MD-401-1101.
Transmission to Bellhousing Bolt Kit: Again, since I purchased the transmission dead last, I didn’t know what it would come with. I purchased the bolts that go from trans to bellhousing ahead of time. If you pull the trans from a junkyard save them. $13.50 Modern Driveline Part #MD-201-2013
Trans to crossmember mount: Believe it or not, the C4 and t5 use the same trans mount. Since I had previously replaced the trans mount on my c4, I just removed it from the c4 and bolted it up to the t5. It was around $6 from rock auto. Do save the t5 trans mount bolts though!
Speedometer Driven gears: Chances are you will need to change your speedo gear to work with the t5. I went on ebay and purchased a 4 speedo driven gear set to play with so I could calibrate my speedo. They will fit the stock speedo cable perfectly. I bought my set on ebay ford genuine, for $19. You will see them around for about $10 a piece.
7 Tooth Speedo Drive Gear: pre sn95 mustangs (so fox era) utilized a 7tooth speedo drive gear in their transmissions. Sn95 era (94-98) use an 8 tooth. Trying to dial in a gear ratio other than stock on an 8 tooth is nigh impossible. I’ll cover this more later, but do yourself a favor and purchase a 7tooth or 6t speedo drive gear. Lets get this done upfront, so later when you decide to change from your stock 3.00 rear gears to 3.55 you don’t also have to drop the trans and deal with this then. I bought mine ford genuine on ebay for $19
9-1/4 Input shaft kit for pre sn95 mustangs: So, this is only required if you pull your trans out of a 94-98 5.0 mustang or v6 mustang. Because the sn95 was physically longer, ford lengthened the input shaft and bellhousings on those cars to move the shifter back. For our 69, we don’t want that. So, if your t5 came out of one of these, purchase this kit. My kit was sourced from ebay for $112.75 and came with the input shaft, steel bearing retainer, new bearings, shims, and seal. Now, you may be thinking “ WHAT! I can’t change that! That sounds terribly complicated!” It’s not, I’ll walk you through it. It’s easy and worth it considering the v6 t5’s are much more plentiful (spelled cheaper) than 5.0 t5’s.
T5 output shaft seal: While we’ve got that trans on a bench, lets replace that output shaft seal! The factory seal has a dust lip on it that many of the replacements offered don’t. This lip greatly lengthens the life of the seal but is hard to source. I eventually got the part number from TIMKEN, 710426, you’re welcome. Source this from your favorite supplier. I think I found mine on Amazon for $12.
1 5/8 Hole Saw: Hole saw? What for? Well, we need to drill a hole in the firewall for our clutch linkage rod. Not able to find this info online, I measured the clutch rod boot that snaps into this hole and arrived at this number. I later did find a post on some forum where a member measured their factory 4spd car hole and confirmed this is a ford sized hole. I bought my hole saw off amazon as no hardware store, including the home depot, carried this size. $16.15 LENOX brand Part # 1772931
Clutch Linkage Kit: So, I purchased this kit from C.J Pony and I gotta admit I wasn’t very pleased. They pieced together the kit and would send them to me once they received them which was messy. First off, I later read that the equalizer bar they supply is a crappy repro that doesn’t fit stock applications well. Not wanting to be hung up by a crappy z-bar I orderd a scott Drake repro. More on this later. Then my lower clutch rod was missing its lock nuts, and the kit was missing cotter pins and such. I’d suggest piecing it together yourself from somewhere like NPD link. But here’s what we need and I’ll give the c.j pony numbers for what I got through them and costs:
65-70 v8 & 6cyl Frame Bracket: This will be a pivot point for our z-bar. $18.47 CJ # CEBBF1
67-70 equalizer bar: the one I used was purchased from NPD LINK, which is a site I learned about after purchasing the cj kit. This is a scott drake unit. Highly recommend. 7528-2A $68.75
Lower Clutch release lever spring: I ended up going to a hardware store and buying a stiffer version because this one was too weak. $15 CJ pony # C9ZZ7591A
Upper clutch release spring: $13.85 CJ Pony # C9ZZ7523A works perfect.
Clutch Rod Boot: This is the boot that goes on the firewall. $10.16 CJ Pony # C6OZ7A533C
Clutch Release Lever Boot: This is the original boot for a 4spd. We will adapt it for our 5speed. Get it. $17.55 CJ Pony # C6OZ7513C.
Lower clutch rod Adjustable: $18.99 CJ Pony #CRL6
Scott drake Equalizer bar Bushing/Bracket Kit: This has the bushings as well as engine side bracket. $20.31 CJ Pony C5ZZ-7A531-K.
Upper clutch rod: Goes between pedal and equalizer bar $16.99 CJ PONY # CRU3
Clutch rod bushings: Sold as a pair but I later learned you need 3. So buy two pair. $5.99 each CJ Pony # HW1260
1969 ford mustang clutch fork release lever: We need this guy, Its just a replacement release lever for a 69 4spd mustang. I bought mine for $41.35 off eBay.
ATF fluid: 3 quarts, $15 at Walmart. Dexron III.
Bellhousing to motor bolts: The fox bellhousing is slightly different, and we need longer bolts. I went to the hardware store and purchased 4 2” long 7/16-14 grade 8 flanged bolts for the four side mounting points and 2 1.5” 7/16-14 grade 8 flanged bolts for the top two mounting points below the intake manifold. the 2” will bottom out there before securing the trans. $12
I’m sure I’m forgetting a few odds and ends, but I have about $1650 in my swap.
DISSASEMBLY:
Removing The Auto: The first step is to get that old tranny out of there. I highly recommend investing in ford shop manuals for your 69. Best investment I’ve made. Follow the instructions in your ford manual for tranny removal. A very brief recap of the removal process goes like this:
• Drop pan, drain fluid, put pan back in place.
• Remove dust shield cover for torque converter. Using a wrench on the crankshaft, turn the motor to reveal the torque converter bolts and remove.
• Remove driveshaft.
• Remove shift linkage assembly. You can go ahead and pull the shifter out of the car, we don’t need it anymore. Save the bolts though! We’ll use those for the shift boot.
• Undo the neutral safety switch and reverse light wires from the plug at the fire wall.
• Undo your trans cooler lines running to the radiator. You can remove them completely from the car, we don’t need those anymore.
• Undo the speedo cable from the trans, but leave the speedo cable in the car, its usable on the t5.
• Loosen your e-brake cable and hang it out of the way
• Remove your exhaust system to have more room.
• Remove your starter. Disconnect the battery first though.
• Support your trans with a trans jack and remove the bolts holding the cross member in place
• Lower the trans and separate it from the motor. This can be tough. I had to use a chisel to wedge between the bellhousing and block. Be careful not to score the block. Also be careful of the
torque converter as it can plop out and onto your foot when moving the trans. It’s not light and it hurts. Ask me how I know.
• Remove the flex plate and engine block plate.
Here the trans has been successfully removed from the car
The car is now ready to begin the T5 conversion.
Converting The Pedal Assembly to Manual: Unfortunately it wasn’t really until after my pedal assembly conversion was pretty much completed I had the thought that I should document this conversion for others, so bear with me. You need to remove the pedal assembly to facilitate this change, it makes it so much easier. The ford manual is useful for this but I will summarize the steps for getting the pedal assembly out of the car:
• Remove dashboard from vehicle. Follow ford instructions for removal
• Remove gage cluster from vehicle
• Remove lower steering column knee cover
• Unbolt rag joint from steering box
• Unbolt the steering column bracket at the firewall
• Unplug steering column wiring harness
• Remove steering column
• Undo master cylinder and other bolts through firewall that attach to pedal assembly hanger bracket
• Unplug brake light switch from brake pedal
• Undo remaining bolts and drop pedal assembly out of car
With the pedal assembly out of the car you can now do the roller bearing conversion
This is the clutch pedal offered from Modern Driveline
It is a beautiful piece that went together well. It comes with the pivot rod you’ll need. This is the Scott Drake roller bearing conversion kit I purchased. Do yourself a favor and grab this kit. It’s worth it. It has excellent instructions that are easy to follow.
While the pedal assembly is out, now is a good time to install that clutch pedal bump stop. Actually, looking at the modern driveline photo it looks like the clutch pedal they make has a provision for the bumper to be attached to the pedal. I attached mine to the pedal hanger bracket. Either is fine.
The issue I ran into is this: Apparently Ford made several different brake pedals. There’s a different brake pedal for an automatic car with power brakes, automatic car with manual brakes (which I have), Manual car with power brakes, and manual car with manual brakes. I was cheap and didn’t want to spend the money on a new pedal. Maybe I could have bent my pedal but I opted to cut it. Here’s what that looks like
Without the clearance the pedals would touch. That’s a no-no. In the end it looks fine, I decided for budget I wouldn’t be too picky about that. Here’s what they look like installed in the car and trimmed
Re-install the pedal assembly
Adding the Clutch Pedal Rod Hole:
Since we are hoping to use the factory style linkage in our build, we need to add that hole in the firewall for the rod to pass through. But where does that darn hole go? After extensive research and staring at the assembly in the car I figured it out. All of fords firewalls are stamped with a dimple where the center of the upper pedal rod hole goes, perhaps as a guide for those on the assembly line. Here is a picture of that dimple drilled. I should have snagged a photo before drilling it but it was about at this point I decided I should document all this. If you look in this area of your 69, It’ll be there.
I’d highly suggest drilling this while the pedal assembly is out of the car, Since my engine was also out of the car, I drilled it from the engine bay. This is where we need to use that handy hole saw we bought, the 1 5/8” one. Here’s a picture,
With that chucked in a drill, we can make our firewall look like this
Kinda scary adding a gaping hole, but it’s essentially to factory spec. Here we see our pedal rod poking through
And finally with the dust boot in place, covering that gaping hole;
This picture was taken much later with the z-bar installed so take it as a foreshadowing of our success.


 irate: