Vintage Mustang Forums banner

How do you organize your parts?

1 reading
2.5K views 22 replies 18 participants last post by  Husky44  
#1 ·
Working on my first true restoration and have been getting some things organized this weekend. The PO had already taken apart quite a bit of the car and, thank God, bagged and tagged just about everything. That being said I've probably got 100-ish baggies of miscellaneous hardware that I'm wanting to get sorted so I can start putting things back together. I'd just like to hear what some of you guys do to keep track of what's what.

Give me some ideas!
 
#3 ·
Freezer storage bags of appropriate sizes marked with a Sharpie pen. All parts being re-used should be restored in advance so you don't have to stop every ten minuted to recondition a bolt or bracket. That gets old real fast. The shop I frequent restores parts as they are removed, i.e., The steering gearbox would be removed, restored, wrapped, and stored while the body is still being stripped.
 
#4 ·
My plan was to go through each bag, relabel and put the parts away. I picked up some 8" x 8" plastic boxes w/ dividers at Lowes for $1.99 each that seem like they're going to work perfectly for this. I figure this will give me some idea as to what I have floating around. I'll probably even go so far as to make a little sheet of what's in each container so I can actually find the parts when needed since I expect this will go into next year before it's finished.

@22GT - Thanks for the tip about restoring parts ahead of time. I can see where this would be a DEFINITE time saver and isn't something I even thought of.
 
#5 ·
When possible, tape the bags directly to the part the fasteners are meant to hold on. This should eliminate quite a few.
I built deep, strong shelves out of 2X4s and 1/4" plywood. Then I labeled the shelves by system, i.e., interior, body, engine, brakes, trans, suspension.
 
#6 ·
Big-assed box, with parts thrown in in no apparent order. Zip lock bags once had labels, but the parts break through the bags and you end up with greasy bags with holes in them that say "starter bolts". The starter bolts are somewhere in the box, underneath all the plastic bags.

When you need a part, just dump the big-assed box out on the workbench, rifle through all the stuff until you find a bolt that looks roughly like the size of the starter bolt. It's not, but it at least gives you something to adjust up or down from. After seven trips under the car, you'll find the right thread pitch, but the bolt will be too long. Rifle all the bolts on the workbench for another hour, then say "screw it, I'll just buy new ones." Drive to the auto parts store with your right-pitch, but wrong length bolt. Rustle around in their bolt cabinet, and find the right pitch and right length bolts. Buy them, take them home. Install your starter with new bolts. Shovel all the loose stuff back in the big-assed box. Then move on to the next project. Dump the box, find the empty baggie marked valve cover bolts. Repeat the process above for valve cover bolts, and you'll find at least 17 bolts perfectly sized for your starter.

When you get good at this process, then move to a new house, and start over again. :D
 
#8 ·
^ That pretty much sums it up!

This time I'm hopefully doing it right though... I bagged and labelled all the hardware whether it's obvious what it's for or not. All the parts are wrapped in bubble wrap and everything is inside boxes in the attic of my garage and each box is labelled with what's inside.
 
#9 ·
That makes the most sense. I however have a storage room off of my garage and with this restoration project, will use it for all hard parts. It gets old climbing the attic stairs all too quickly.

Now, if I can just get the wife to do something with the couch stored in my garage/man cave.
 
#10 ·
Does a "pile" count as a method?

But seriously, The methods already suggested are good ones. I got a big box of about 500 manilla tags with strings. I did one of 2 things - either tie the tag directly to the part or put the tag in a plastic bag with the part. Sharpie on a plastic bag works great, but I also put a tag in the bag since sometimes labels on bags will wear off - usually only if you get some kind of chemical on them. For storage, I grouped similar parts together and stored them in boxes and I labeled the boxes on the outside. I've got shelves that I store the boxes on. Right now, my dining room and basement are serving as storage areas since I have so many new parts.
 
#11 ·
Beside the ziplock bags, I used the plastic bins from Home Depot and organized them like "interior" etc. I had about 12 or so.
Stan
 
#12 ·
Bagging methods have been covered...

But my favorite way to restore fastners was to keep cardboard boxes, especially the half 4" high ones from beer cases, punch holes with screwdriver and as you disassemble, just push the bolts into the holes. Then write on the backside what they came from. I would then take the box to the blast cabinet to blast them all clean & paint them right there still in the box!
If you push them in just before the bolthead hits the box, blasting will clean the entire bolthead.
For cleaning everything else to prep, my Metabo 4.5" Grinder with a wirewheel cup on it was my righthand man! It quickly cleans off your hardparts to clean metal with no damage, ideal I think. Then blast to get the hidden nooks that the wirewheel couldn't reach.

The most important thing that I can pass along is this: DO NOT THROW ANYTHING AWAY FROM THE CAR UNTIL THE PROJECT IS DONE! You would be amazed at what little parts, grommets, screws etc that are attached to bigger parts that you think are irrelevant or will come new with kits later but they don't! Plus, just having the old parts in hand to compare where they fit, measure from, and simply ease your mind that you reassembled correctly is PRICELESS!
 
#13 ·
I found that stapling the bagged parts to the garage wall made it significantly easier to find the parts I needed for a particular task during reassembly. I would assign one end of the garage wall as "Front" and the other end as "Back". The bags would be placed in the approximate location front to back as the parts would be on an assembled car. This allowed me to avoided digging through multiple plastic bins looking for something. It saved me hours of search time. I've done three cars this way and it works well.
 
#15 ·
I'm fortunate that in my garage I have a good amount of space in the rafters. I laid out some plywood and have all my extra body pieces (fenders, bumpers, quarters, etc.) stowed away neatly over heard. I also have several big plastic bins with larger parts that wont be used for a while up there as well.

@JeffTepper - That's an interesting idea about stapling the bags to the wall. I'm not sure if it would work for the setup I have but it's certainly cool.
 
#17 ·
Good suggestions above...I would also suggest ordering the Mustang Assembly Master Kit Manuals for your specific year as well as considering getting AMK's master kits. Those saved me - gave the restoration a "finished" and professional look. I agree to save everything unitl its all done. The master kits are well organized and have a great deal but not everything..... plus get ready to lose a few things along the way...
 
#18 ·
My '67 has it's own dedicated 4x8 bench with a shelf under it. Some floor space and wall space. Also two 4x8 sheets of pegboard on the wall covered mostly with bagged parts. Being that my car is about 80% together, you'd think it would be easy to find stuff. Yesterday I finally trial fit the new front valance (not too godd) and figured I'd see if the turnsignals fit (no). Grabbed the right signal immediately. Still complete with the dirt, wiring, lens, and rust like when I took it off 10 years or so ago. Hunted the left one for 30 minutes. Even with some help from a second pair of eyes I still haven't found it.
 
#20 ·
I've always liked the idea of pegboard with all associated parts and fasteners attached. Label each pegboard with the area of the vehicle that the parts go to and you are totally set. Makes it easy to find your bolts and small parts and if you pin up the part that they actually go with, you can even label where each one goes on the part.

That said, my strategy is to pile everything up on a bench. If I need to use that bench, the pile goes onto the other bench. Anything that needs to be kept nice and unscratched (trim, interior panels, whatever) gets wrapped in towels and stacked separately, but still on the same bench :p I do tend to stuff bolts in labeled bags when I remove it them from the car, but it's way more likely that I'll pull a bolt or screw and then tape it to the car somewhere near the place they were pulled from. Easier to find that way!
 
#21 ·
I agree with the others, especially about restoring parts as you remove them.
Also if a part needs new hardware or gaskets, put the new stuff right in with it.
I like Mr. Teppers idea too.

Your boxes should be labelled on the top and sides, so you'll be able to read the contents even if you stack them.
Here's my pile-o-parts.
Image


Big pieces of cardboard and ty-wraps work really well to store longer items.
Image


Parts being painted....
Image


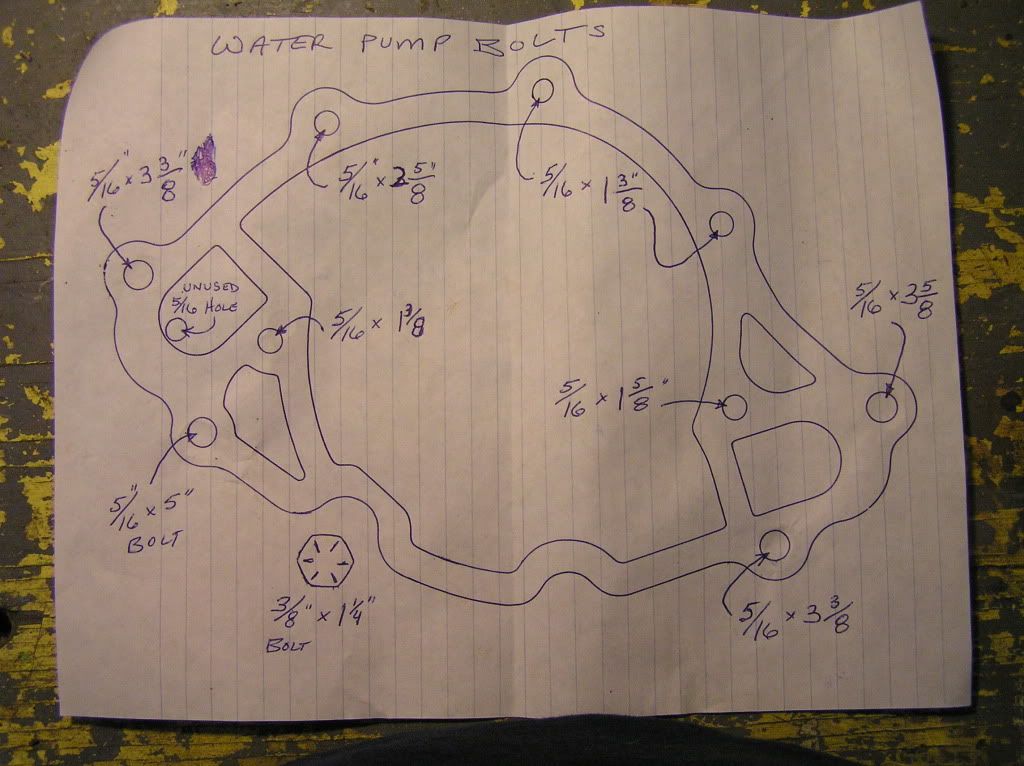
If you have multiple bolt lengths and sizes, you can use an old gasket, or draw a diagram to help keep things sorted.....
For example...
Image


Good Luck
MB
 
#22 ·
They are somewhere! If I can't find it I search for another OEM used. When/if I find it I have a spare!


Slim